As a slight change from building locomotives and rolling stock I decided that I'd have a go at turning some of the 4mm scale Slater's embossed Plastikard that I bought back in July into a small building to see how well it worked and how exactly to use it. My original plan had been to build a cardboard shell and then to cover it in the plastikard as this would make a nice rigid structure. Unfortunately I suffered a severe cause of cowboy builder.
I spent quite a while drawing out the parts on the computer and made templates for the four walls in 2mm cardboard and then four walls in the plastikard to match. Unfortunately I managed to get the sizing wrong when going from the shell to the outer layer. Having cut out all 8 parts it was clear that they wouldn't go together, but it was also clear that the 2mm cardboard was too think for the wall depth I wanted, given the door and window parts I had to hand (these are from the PECO building components pack, part number LK-78). Rather than trying to redraw the cardboard shell I decided, given it was only a small test building, to just use the plastikard without any reinforcement. So I set about joining the walls together using plastic weld from E.M.A. Model Supplies.
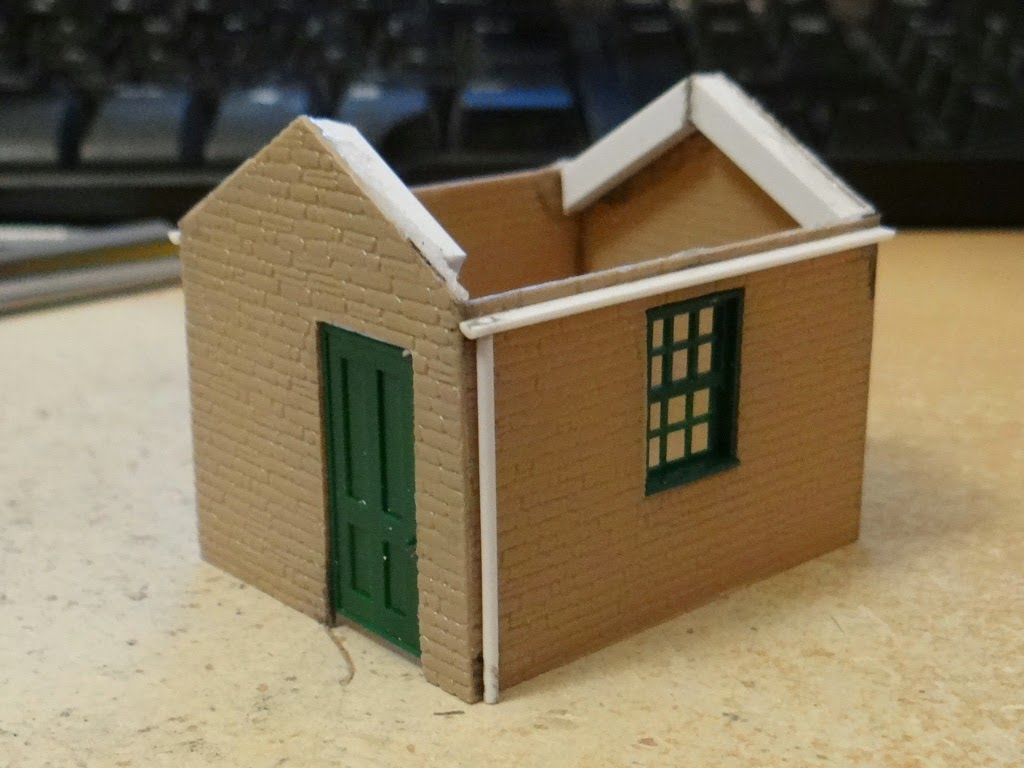
I'm still amazed at just how strong a joint the plastic weld creates, and once all four walls were joined the structure is remarkably solid. While the window frame fitted nicely I decided I needed a little more depth to the door. This was easy to achieve by simply adding some 0.5mm plastruct strip around the door frame using more plastic weld (note to self: make sure the window is open wider next time you use this stuff). There is a gap under the door as I'm intending the bottom few millimeters of wall to be underground so the building won't appear to float.
The rest of the bits you can see are all more sections of plastruct. There are some 4mm square sections used as roof girders to thicken the side walls and give me somewhere to attach the roof. The gutter is 2mm half round and the drain pipe is 1.3mm rod; I drilled a hole in the half round and slotted the rod in to make a nice solid joint.
The next step is to sort the roof. I'm going to experiment with adding separate roof tiles so it might take a while, even though it is only a small roof. Once that's done it will be on to painting, which will hopefully hide some of the more cowboy builder aspects. For a first attempt it's ... well if I'm being honest fairly terrible. Terrible it may be but at least I'm learning things that will be useful for the next attempt.
Wednesday, September 17, 2014
Tuesday, September 16, 2014
Canopus: Covering Up The Solder
While I was fairly happy with my soldering of the chassis I do think hiding most of it behind a layer of paint improves things no end! This is by no means the final layer of paint the chassis will see, but I decided to get a base coat on (it's Humbrol matt black primer) and to paint in the flycranks before going any further. The next step is to permanently affix the coupling rods at which point it would be difficult to paint the chassis, and almost impossible to neatly paint the flycranks.
There are still a few parts that need to be glued or soldered to the chassis, which I can't fit yet, so I will have to remove small areas of paint to get a good joint, but it should be easy to touch up the paintwork, and anyway most of the chassis is hidden or will be shadowed by the body.
The good news is that having stripped it down, painted it, and then reassembled it, it still runs nice and smoothly.
There are still a few parts that need to be glued or soldered to the chassis, which I can't fit yet, so I will have to remove small areas of paint to get a good joint, but it should be easy to touch up the paintwork, and anyway most of the chassis is hidden or will be shadowed by the body.
The good news is that having stripped it down, painted it, and then reassembled it, it still runs nice and smoothly.
Monday, September 15, 2014
Changing Points ... With Style
Back in May I started looking into how I would operate the points on the OO9 gauge layout I'm intending to build. I made the decision to use a servo to throw each point and wrote two posts, one on the electronics and one on actually using the setup to throw an OO9 point. The one thing missing in both of those posts was an actual switch of any kind; I triggered the point throw by simply pulling one of the Arduino pins to ground with a short piece of wire which is clearly not a long term solution. The second of my railway related birthday presents (the first being the Heath Robinson book) has solved the problem in a very stylish fashion.The solution to the problem is a Cobalt-S switch lever from DCCconcepts. Essentially this is a simple combination of a momentary switch and two SPDT switches, but it is packaged to look and work like an old fashioned point/signal lever. Of the nine wires I've currently just used two (one half of one SPDT) to trigger the electronics.
The angle of the video doesn't really show off the lever at its best although it does nicely show the lock mechanism. I've also yet to paint it or attach the rest of the detailing parts, but I think we can all agree that it's quite a stylish way to change the points. I'll need to pick up another one at some point as I'm planning two points on the layout but that is one more decision taken.
Friday, September 12, 2014
Three Bars or Four?
You may remember that back in June I designed and 3D printed some small 3 bar slab wagons. These were reasonably well received albeit with some helpful suggestions. When I ordered the Aberllefenni box wagons I also updated the 3 bar slab wagon and printed another set as well as a 4 bar variant. I got side tracked by building Canopus though and so have only just got around to assembling and painting these.
It's difficult to tell from a photo but I do think the 3 bar version looks much better now that I've extended the bars slightly; it really is a very small change but it gives a much better balanced model. The 4 bar variant is of a similar size although it includes some extra details taken from a number of prototype photos etc, again these are kind of difficult to see in the photo. As usual, both are now available via Penistone Railway Works (3 bar, 4 bar) should you fancy a few.
Monday, September 8, 2014
Canopus: It's Alive!
Okay, so while I know that my plan was to paint the chassis next (before it would be difficult to get at with all the motion permanently attached) I just couldn't stop myself from performing a quick in-situ test of the gearbox and motor.
Given that this is the first locomotive I've built where I've had to form the entire chassis and gearbox I'm really happy to see all the wheels turning move under their own power. The test did highlight a slight issue with the way I'd put the gearbox together though.
When I was working out which way around to fit the gearwheel to the gearbox I worked from the idea that I should align the larger part of the gear with the shaft of the motor to ensure it meshed well with the worm gear. Unfortunately because of the way around I'd fitted the axles this didn't work, but I only found out once I'd fitted everything together properly.
If you look at the gear on the rear axle you will notice that on the lower surface it has a boss that extends out along the axle which isn't present on the top surface (you can just about see this in the photo to the left, but it is a lot clearer in the photos from the previous post. The problem is that when the gearbox is fitted the larger part of the gearwheel is fouled by the boss if it is fitted on that side of the axle gear.
Fortunately it is easy to fix this by simple rotating the gear in the gearbox (given I can't swap the wheels around as they are permanently trapped in the chassis). Although the worm and gear are now no longer in line they still mesh nicely and everything turns freely.
Given that this is the first locomotive I've built where I've had to form the entire chassis and gearbox I'm really happy to see all the wheels turning move under their own power. The test did highlight a slight issue with the way I'd put the gearbox together though.
When I was working out which way around to fit the gearwheel to the gearbox I worked from the idea that I should align the larger part of the gear with the shaft of the motor to ensure it meshed well with the worm gear. Unfortunately because of the way around I'd fitted the axles this didn't work, but I only found out once I'd fitted everything together properly.
If you look at the gear on the rear axle you will notice that on the lower surface it has a boss that extends out along the axle which isn't present on the top surface (you can just about see this in the photo to the left, but it is a lot clearer in the photos from the previous post. The problem is that when the gearbox is fitted the larger part of the gearwheel is fouled by the boss if it is fitted on that side of the axle gear.
Fortunately it is easy to fix this by simple rotating the gear in the gearbox (given I can't swap the wheels around as they are permanently trapped in the chassis). Although the worm and gear are now no longer in line they still mesh nicely and everything turns freely.
Saturday, September 6, 2014
Canopus: Building the Gearbox
As I mentioned in a previous post, I was a little concerned about building the gearbox for Canopus as the supplied parts differed from those originally used in the kit and it appeared that the new parts wouldn't build into a working gearbox. Fortunately I have now built a working gearbox, but before we get to that let me show you the problem with following the instructions given the change of parts.
As you can see from the first photo the gearbox fits between the rear driving wheels. The instructions say to solder the bearings to the outside of the gearbox and then file off anything that protrudes through to the inside. This is easy to do, but when you then fold the gearbox to shape you find that the clearance between the bearings on the outside of the gearbox and the wheels is very minimal. I couldn't actually see a gap although the wheels did turn freely without moving the gearbox. With such minimal clearance though any slight movement and chances are the wheels would touch the gearbox and this would likely lead to a short as the chassis is live. I'm assuming that this wasn't a problem with the kit originally but results from a change to the actual gears. Originally two separate gears were supplied rather than the new combined gear and I'm guessing that they fitted onto a thinner shaft and that the appropriate bearings had a smaller outer face.
The change in gears presents a second more important problem. The width of the two original gears appears to have been equal to the inner dimensions of the gearbox. With an interference fit between the gears and the shaft this would mean that they wouldn't move sideways within the gearbox. Unfortunately the new gear is much thinner. This means that the shaft is free to move sideways and any sideways movement causes it to drop out of one of the bearings. It would also appear that the shaft is a little undersized as the gear is a very loose fit; it measures 1.97mm and is loose in the bearings designed for a 2mm axle (they are the same as those used for the wheels). Fortunately it turns out that both problems are solvable without too much effort.
As you can see from the photo I've assembled the gearbox while completely ignoring the instructions. Firstly I've fitted the two bearings from the inside instead of the outside of the gearbox to improve the clearance with the backs of the wheels. Secondly I've replaced the shaft with some 2mm brass rod (yes I know I need to cut it to match the width of the gearbox but I've left it long so you can see it) as this is ever so slightly thicker (0.03mm to be precise) than the original and is a tight interference fit with the gear wheel. While the gear no longer slides on the shaft it would still move sideways in the bearings but I've solved this using a third bearing. The kit contained a spare 2mm bearing which just happens to be the perfect width to fill the gap. So now I have a gear box where there is no sideways movement, the gear wheel is a tight fit to the shaft, and the shaft rotates freely. A quick test with a 9V battery and the motor shows that it works perfectly; I haven't fully pushed the worm gear onto the motor shaft as once it is on it will be difficult to get off and it can only be fitted once the motor and gearbox are fitted to the chassis.
So I know have a working gearbox, I just need to trim down the brass rod before fitting it to the chassis. I'm thinking that the next step might be to paint the chassis because once the motor is fitted it can't easily be removed and I don't want to risk getting paint in the wrong place. Also it will be easier to paint the cranks etc. before permanently fixing the coupling rods and adding the rest of the motion.
As you can see from the first photo the gearbox fits between the rear driving wheels. The instructions say to solder the bearings to the outside of the gearbox and then file off anything that protrudes through to the inside. This is easy to do, but when you then fold the gearbox to shape you find that the clearance between the bearings on the outside of the gearbox and the wheels is very minimal. I couldn't actually see a gap although the wheels did turn freely without moving the gearbox. With such minimal clearance though any slight movement and chances are the wheels would touch the gearbox and this would likely lead to a short as the chassis is live. I'm assuming that this wasn't a problem with the kit originally but results from a change to the actual gears. Originally two separate gears were supplied rather than the new combined gear and I'm guessing that they fitted onto a thinner shaft and that the appropriate bearings had a smaller outer face.
The change in gears presents a second more important problem. The width of the two original gears appears to have been equal to the inner dimensions of the gearbox. With an interference fit between the gears and the shaft this would mean that they wouldn't move sideways within the gearbox. Unfortunately the new gear is much thinner. This means that the shaft is free to move sideways and any sideways movement causes it to drop out of one of the bearings. It would also appear that the shaft is a little undersized as the gear is a very loose fit; it measures 1.97mm and is loose in the bearings designed for a 2mm axle (they are the same as those used for the wheels). Fortunately it turns out that both problems are solvable without too much effort.
As you can see from the photo I've assembled the gearbox while completely ignoring the instructions. Firstly I've fitted the two bearings from the inside instead of the outside of the gearbox to improve the clearance with the backs of the wheels. Secondly I've replaced the shaft with some 2mm brass rod (yes I know I need to cut it to match the width of the gearbox but I've left it long so you can see it) as this is ever so slightly thicker (0.03mm to be precise) than the original and is a tight interference fit with the gear wheel. While the gear no longer slides on the shaft it would still move sideways in the bearings but I've solved this using a third bearing. The kit contained a spare 2mm bearing which just happens to be the perfect width to fill the gap. So now I have a gear box where there is no sideways movement, the gear wheel is a tight fit to the shaft, and the shaft rotates freely. A quick test with a 9V battery and the motor shows that it works perfectly; I haven't fully pushed the worm gear onto the motor shaft as once it is on it will be difficult to get off and it can only be fitted once the motor and gearbox are fitted to the chassis.
So I know have a working gearbox, I just need to trim down the brass rod before fitting it to the chassis. I'm thinking that the next step might be to paint the chassis because once the motor is fitted it can't easily be removed and I don't want to risk getting paint in the wrong place. Also it will be easier to paint the cranks etc. before permanently fixing the coupling rods and adding the rest of the motion.
Monday, September 1, 2014
Heath Robinson
Now before anyone gets any ideas, Heath Robinson is not a description of my attempt at building the gearbox for Canopus. I've actually not done any more work on Canopus since the previous post as we've been away on holiday.
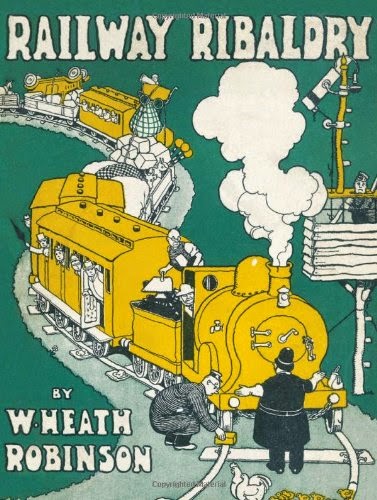
Even though I don't have any modelling updates to report, I thought a post was in order, and fortunately one of my recent birthday presents gives me something to blog about. I actually got two railway related presents, but you'll have to wait a bit for details on the second one. Today I give you a very brief review of Railway Ribaldry by W. Heath Robinson.
This clearly isn't a new book, the author died in 1944, but is a new reprint of a book originally published in 1935 to commemorate the centenary of the Great Western Railway. As you would expect, the book is a series of cartoons or illustrations showing weird and wacky railway inventions. It's not a long book, there are about 100 drawings, but it is certainly amusing and this nice quality reprint (it's not a cheap paperback just put out to make money) does the original justice.
Even though I don't have any modelling updates to report, I thought a post was in order, and fortunately one of my recent birthday presents gives me something to blog about. I actually got two railway related presents, but you'll have to wait a bit for details on the second one. Today I give you a very brief review of Railway Ribaldry by W. Heath Robinson.
This clearly isn't a new book, the author died in 1944, but is a new reprint of a book originally published in 1935 to commemorate the centenary of the Great Western Railway. As you would expect, the book is a series of cartoons or illustrations showing weird and wacky railway inventions. It's not a long book, there are about 100 drawings, but it is certainly amusing and this nice quality reprint (it's not a cheap paperback just put out to make money) does the original justice.
Subscribe to:
Posts (Atom)