Showing posts with label Tamiya. Show all posts

Sunday, October 9, 2016

Figure Painting

So in the previous post I mentioned I'd used a new painting method. Technically it's not new, but it's not something I'd tried before and that is stain painting to colour the figures.

All the figure painting I've done in the past (either recently or when painting Games Workshop figures in my misspent youth) has followed the same approach of block painting colours and then either picking out the highlights with dry brushing or emphasizing creases using thin washes. The problem is that this can be quite time consuming and more importantly finding complimentary colours for highlights and washes can be tricky. This new, for me, approach inverts this process. If you want lots of details then I followed the suggestions on this web page, but essentially you can see the whole process in these four photos.


The first step is simply to paint the entire figure black. This is followed by dry brushing with white to pick out the highlights. Colours are then added using paint diluted with water (to a consistency like milk). Rather than completely covering the underlying areas this essentially stains the lower layers allowing the creases and highlights to show through. A quick waft of matt varnish to helps tie everything together to give...


This is of course a rather cruel close up being many times life size, but you get the general idea. As I said at the start it's not a new idea, but was something I've never tried before, but from this brief test will be something I'll be doing a lot more in the future.

Saturday, June 7, 2014

Painting Wood

While I was really happy with how the wood colouring of the 3D printed flat wagons turned out it should be obvious that the colour is really only suited to newly planed wood and that in use on a railway unpainted wood wouldn't stay this colour for long. The advantage of having 3D printed the wagons is I can easily print some more and paint them in different states of repair. I currently have some more on order but before they arrive I thought I'd do some experiments to work out how I'm going to represent wood in different states of ageing.

When I ordered the first set of wagons in the finely detailed material I also ordered a set in the cheaper material I've used before for printing OO gauge wagons. While these didn't turn out well enough to be useful as models, I thought they could form the basis of a useful set of painting experiments. It is worth remembering though that as they are made from a different, much rougher and more absorbent, material that the final wagons will look slightly different.

I had two approaches I wanted to try. Firstly there was Iain's suggestion for producing a silvery grey wood colour and then a dry brushing based method that I'd read on a forum that I thought worth trying.

I started with a variation on Iain's suggestion; the variation being that I didn't have any Humbrol #27 in my paint box so I substituted Model Color's London Grey (#70.836) which I believe is a 50/50 mix of black and white. So I started with a layer of London Grey, then a thin wash of black (Model Color 73.201) before dry brushing on some Tamiya Gun Metal. I also dry brushed on a small amount of khaki (Model Color 70.988). You can see the result on the left hand model. This seems to work quite well, and I would never have though about using a metalic paint to add the aged effect. I might need to experiment with both the base grey and the amount of black wash, especially as in reality it looks a little darker than the photo, but it looks pretty good.

The second approach is similar in that there is a base colour, a wash and some dry brushing but there are quite a few more paints (all Model Color) involved. I started by painting on a layer of black (70.950) and then once that was dry a layer of khaki keeping the layer thin enough to allow the black to give slight variations in the finish. I then used the black wash (73.201) to detail the gaps between the planks etc. and to tone down the khaki. A round of dry brushing then followed using khaki followed by brown sand (70.876) and finally dark sand (70.847) which confusingly is a lighter colour than brown sand. I then retouched in the details by adding a very thin watered down layer of the black wash. The final touch was then a very light dry brushing of dark sand to lighten the raised areas ever so slightly. Obviously the effect and colour is very different to the first approach, but then it represents a different stage of the wood ageing. In fact this approach seems to match quite well with my next door neighbours unpainted fence which I think is around 10 years old.

Of course I'm not sure how well these approaches will work on the other material, but hopefully another bunch of models should arrive from the printers next week some time so I shouldn't have too long to wait to find out.

Friday, April 25, 2014

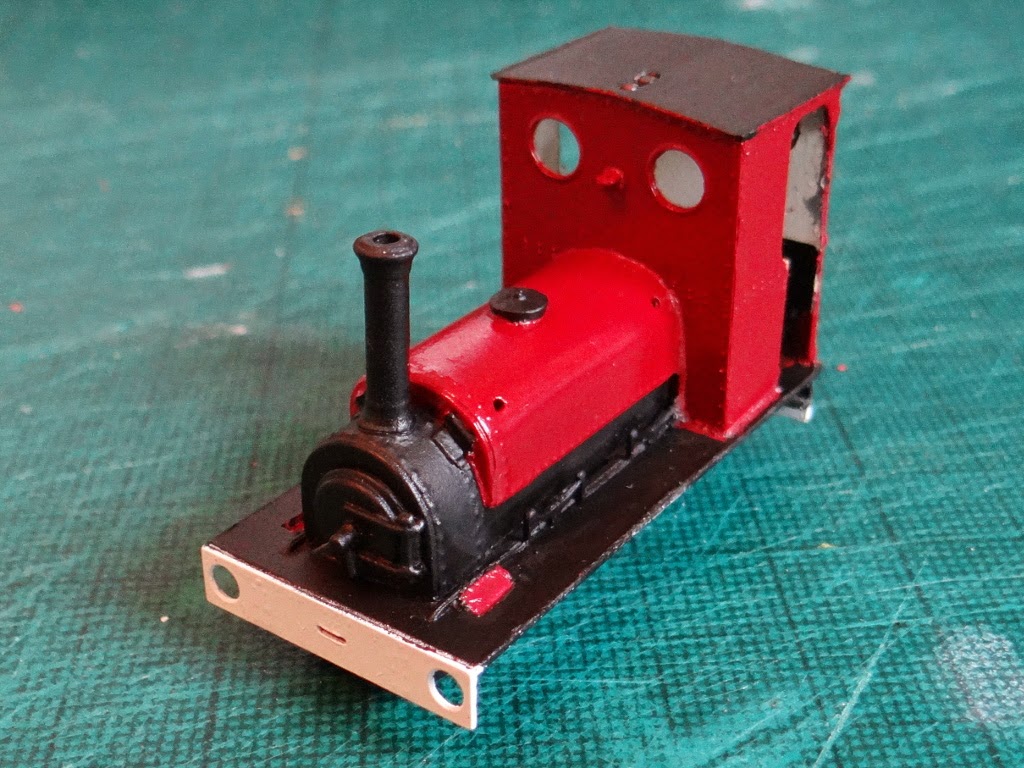
Quarry Hunslet: The Crimson Horror

So, as you may have seen from my rather brief previous post, painting the main body colour of the locomotive did not at all go to plan. Fortunately it was possible to rescue the situation as you can see from todays photo.

Here in Yorkshire we haven't had much sun today which explains why the colour looks way brighter than it really is (the camera over compensating for the terrible light). In reality I've painted it using Humbrol acrylic #20 "crimson", which is quite a dark red. There are a number of areas that need touching up but in general the main areas are perfect.

Now you've seen that the situation was recoverable, let's back up and see how I ended up in quite such a mess. After painting the cab controls (which I'll come back to in a later post) I carefully masked up the inside of the cab while it was still separate from the body and then glued it into place. I then masked up the rest of the model (using the excellent Tamiya masking tape). I also used some Humbrol maskol at the edges of the tape, or where it was difficult to line up the tape properly, including around the cab windows. I then sprayed on the Humbrol crimson paint.

My first mistake was to use too much paint. Paul had warned me that red in particular is quite translucent and so benefits from a white primer. In fact this red paint was so translucent that I could see the white primer through it in places. To stop the white showing through I had to add more paint. Once the paint was dry (or at least I thought it was) I noticed that it appeared to have run on one of the cab side panels. It was annoying but I could probably have lived with that. What I couldn't live with was what happened next.

Now I don't know quite what the problem was but as I removed the maskol I'd used around the windows it pulled off the top layer of paint leaving just the primer behind. If this wasn't bad enough as I tried to remove the masking tape from inside the cab I popped one of the side panels loose. Finally when trying to remove the masking tape from the chimney it simply fell off. At this point I was not a happy bunny and certainly not relishing the thought of repainting. One of the main problems was that I wouldn't be able to mask things up in the same way now the cab was (mostly) attached to the footplate, so I decided to brush paint instead of spraying.

Before I could repaint I had to finish removing the old paint which given it was all on a metal surface came off quite easily with the aid of cotton wool buds, nail polish remover and blunted cocktail sticks. I did have to replace the rivet transfers though as they came off with the paint. So once everything was nicely cleaned up I brushed on Humbrol acrylic grey primer and left it to dry. To say it was streaky was a bit of an understatement but I decided I'd continue on and brush on the top coat; still Humbrol acrylic crimson, but from a small pot. This was definitely not a wise move. It turns out that none of the Humbrol acrylic paints brush on well; I suppose they might if diluted, but then I'd probably have the same translucent problem. By this stage it was looking pretty horrible, so I started to strip the paint off for a second time.

Once the paint was cleaned off for a second time, I again masked the black areas and the inside of the cab as well as I could and sprayed on the primer. This time I went for a red oxide primer in the hope that even if the crimson was slightly translucent it wouldn't show up. The primer went on well, so I then sprayed the crimson again, being careful to use as little paint as possible. After leaving it to dry over night I carefully removed the masking tape and this time everything went to plan. Not only did the paint stay attached but I hadn't ruined the cab interior either.

So I now have some tidying up to do (the edge of the cab roof for instance), and then I can finish painting in the details.

Tuesday, April 22, 2014

Quarry Hunslet: Primed and Ready

While I was a little worried about actually having the skills to build this locomotive, I'm also worried about my painting skills after the disaster that was the Baguley-Drewry. I have just invested in an airbrush (more on that in a later post), but for this loco I'm going to stick with what I know and use aerosol cans of Humbrol paint. There are two main changes to my approach from last time. One I'm going to take more time to ensure each colour is fully dry before masking, and two I'm using more expensive masking tape (Tamiya).

The first step to painting was to dismantle the locomotive to remove the motor and the cylinders etc. I then primed it with a white primer meant for painting cars to provide a good base colour for the later colours.


I'm still treating the cab and body separately until I've painted the cab controls which is my it is missing in the middle photo. I decided the next colour would be the black which makes up the majority of the body, so I masked off the tank, buffers and cylinder covers (the purple stuff is Humbrol Maskol, which I really should remember to only use with the window open) and sprayed on a couple of layers of satin black. After leaving the paint to dry for an hour or so I gently eased off the tape and maskol and was pretty impressed with how it has turned out; there are a few spots that need touching up but I can live with that. Buying decent masking tape was certainly worth every penny.

Next up will be painting the inside of the cab so I can finally attach the cab to the footplate before spraying the main body colour.

Monday, September 30, 2013

Maybe It's A Woollen Mill?

I'm still to decide exactly what business S. A. Tan and Sons are in, but maybe they are running a woollen mill?


I didn't want to fill the layout with sheep, so I've used just three from the pack of eight I bought from Langley Models (model number A70). For those that are interested (and to make sure I can remember) they were painted by first spraying with Humbrol grey primer before the face and shadow detail was painted black (Tamiya flat black). The wool was then dry brushed using first white (Tamiya) and then Ivory (Model Color).

If you look closely you might also be able to spot the squirrel.

Sunday, August 11, 2013

Health And Safety: The Missing Details

The previous post was meant to be more than just a single photo, there was meant to be some textual content as well; specifically details on how I made the "Beware Of The Trains" sign. Unfortunately I managed to press Publish instead of Preview! So here are the details behind the making of the sign.

While I'm sure I could have bought a Beware of the Trains sign I decided that it was simple enough for me to have a go at making my own; after all it's only two colours, how hard can it be. The major problem is the size of the sign. The sign is approximately 3.5mm wide by 2.5mm tall. This means that the large letters are written in a 2.4pt font! Given that 10pt font is considered small you should be able to get a good idea just how small the letters are. If not then these photos should help.


The first photo really gives a good sense of the scale of the sign, it also shows that laser printed ink actually rubs off quite quickly! To stop this happening I painted on a thin layer of Humbrol enamel satin varnish before I tried handling the printed area. The printed and varnished paper was then stuck to some thin black cardboard (it's probably around 200gsm) and then carefully cut out using a sharp knife.

I made the post from some 0.6mm wire (the same stuff I used on the trees). I cut a piece about 1.4cm long to give me a 5 foot post (at 2mm to the foot that is 1cm) plus 4mm to go into the layout surface. I held the wire in a pin vice while I painted it with Tamiya flat black. Once the paint was dry, I used a cocktail stick to put a tiny drop of superglue on the back of the sign and then glued it to the post. Once the glue had set I gave the whole thing another thin coat of satin varnish. The final step was to drill a small hole (0.65mm drill bit) into the layout and slide the post in.

If you fancy making your own sign then feel free to re-use the SVG file I created (I've included both a white on black and a black on white sign). I did try converting the SVG to a more common format (like a PNG or a PDF) but in everycase the converted file lost too much detail making the small letters unreadable. I'd suggest opening the file with Inkscape and printing at the highest quality setting your printer can manage.

Wednesday, August 7, 2013

Take Me Home, Country Roads

Just a quick post today to show a couple of features I've recently completed.

Firstly I've re-done the road surface. If you remember from the previous post I painted the road grey and then washed it with thinned down black paint. This kind of worked but left the road quite black, almost looking as if it had just been rained on. Having repainted it a couple of times I still wasn't happy and so I had a look for a different solution. In the end I've gone with another Woodland Scenics product; Asphalt Top Coat. As the name suggests this is specifically designed as the top surface of a road. It is quite a thick paint that produces a fairly smooth level surface as it dries, so while I'm really happy with the colour and texture I might need to introduce a pot hole or two for realism.

As you can see I've now also painted and fitted the dry stone wall, and I hope you will agree that it looks a lot better than in it's unpainted form. In case I need to paint any more matching stone work in the future (or you wish to replicate the colouring) I first painted the entire wall with Tamiya Flat Black and then dry brushed on Woodland Scenics Stone Gray followed by Model Color Flat Earth, and finally Model Color Ivory. To take the shine off I then used a little Humbrol Smoke weathering powder. Having glued the wall in place I think it does a pretty good job of hiding the join between the land and the back scene (although I won't know for certain until I get the sky sorted). In fact I've decided to add a wall on the other side of the bridge for the same reason, although that wall will in turn be hidden by some shrubs, but that is a job for another day.

Wednesday, February 6, 2013

Bringing Out The Details

One thing I wanted to find out, before going much further with the 3D printed wagon model, was how it looked after painting. While I've painted 3D printed items before they have all been printed from a high detail acrylic polymer, whereas the wagon is made using an entirely different process (it involves lasers). Fortunately, the answer is that the cheaper materials paint fairly well as the photo shows.

In the past I've painted entire wagons using aerosol cans of primer and paint. While this does work, the problem I've found is that while the primer goes on well the paint tends to go on quite thick and you run the risk of obscuring some of the finer detail. So on this occasion I used an aerosol of primer, but then applied the paint (Tamiya Color XF-1, Flat Black) by hand using a brush. This seemed to work really well, although it did need a couple of coats to get a good covering of paint. I then did a little dry-brushing (with Tamiya Color X-10, Gun Metal) to pick out the metal work and bolts. This wasn't a complete success, but wasn't disastrous either, and has helped to show off some of the finer detail in the model.

The main difference between this wagon and the others I've painted in the past is that the surface of the plastic isn't smooth -- I've seen it referred to as "sandpaper like". Now if I was trying to model a smooth surface (like metal) then this might be an issue, but the wagon is predominately made from wood, and even newly painted wood isn't entirely smooth. Personally I think the rough surface shouldn't be a problem, it definitely looks different but I don't think this is really a bad thing. The only issue will be how well waterslide transfers will stick to the surface. As the prototype wagon isn't really the right size (it should be taller) and is missing a lot of details I'm not going to waste a set of transfers on it, so that test will have to wait until I do another print run of the more detailed model.