Another day and another catch up post. This time two more episodes in the video series looking at models I've finished building from kits or kits I've finished designing. This time we have one of each, and an excursion into a bigger scale.
Showing posts with label K12 Diesel. Show all posts
Showing posts with label K12 Diesel. Show all posts
Thursday, March 23, 2023

Tuesday, September 27, 2022
I Stand in Awe of...

Having waited three years to see the book appear it was great to finally get hold of a copy on Saturday. Entitled "Half A Century of Locomotives from Alan Keef Ltd 1972-2022" and published by Lightmoor Press it's a nice hardback running to 160 pages, and was well worth the wait.
Looking at the cover it's nice to see a photo of AK6 (middle left) given that was the start of the journey for me building the model and then writing the article with Alan. Alongside the main content of the book are three pages towards the end which look at models people have built of the companies locomotives, and not only does that include my model of AK6 but the following lovely caption:
I stand in awe of Mark Greenwood for this model of a "K12", specifically AK 6, with a peat wagon in tow. Even this picture may show it as bigger than the actual model, as can be seen from the shot below of the locomotive alongside a 20p piece!


Thursday, June 18, 2020
Alan Keef K12 Diesel: A Duplo Epilogue

On one occasions though, when I told him the challenge was a locomotive his answer was that he wanted to "build one like you did in the magazine". He was of course referring to the K12 diesel locomotive. He'd probably been reminded of it, because a day or so earlier the latest copy of the REVIEW had turned up and we had looked at it together, and the inside of the front cover was a full page Narrow Planet advert which included a photo of my completed model.
So we got the Duplo out and looked at the picture. Now I was a little concerned because I wasn't sure how he was going to do the wasp stripes. I shouldn't have worried though as he was adamant he wasn't going to add them. Which is fine of course because, as you may remember, only AK6 was fitted with the extra protection back and front onto which the wasp stripes are painted.
He started quite logically by finding all the orange Duplo pieces he has and then started to put them together. To say I had a very proud parent moment when he finished would be a serious understatement. Posed next to one of my prototype models that doesn't have the wasp stripes and I was very very impressed.

Okay, so I'm sure if he'd wanted to he could have built a better locomotive from his Duplo, but given the relative lack of orange pieces he had and the size of the pieces I think he did an excellent job. I think we're going to have a lot of fun doing modelling projects together when he's a little older.
Tuesday, June 16, 2020
Alan Keef K12 Diesel: Finished
Whilst there is still only a little modelling happening I thought I'd try and keep the blog alive (or more than it was anyway) by making sure all the loose ends from previous posts were tidied up, even if that meant going back even further than finishing Canopus in February.
We last looked at the Alan Keef Ltd K12 diesel locomotive I was building all the way back in March of 2019 when I explained the origami required to turn the flat etched parts into the bonnet and cab. Having successfully (on the third attempt) designed the etched parts I was able to finally build and paint a complete model; and I'm still really quite impressed with the stencil idea for the wasp stripes!


And here it is posed on my tiny photo plank with the etched peat wagon I started working on at roughly the same time as the locomotive.
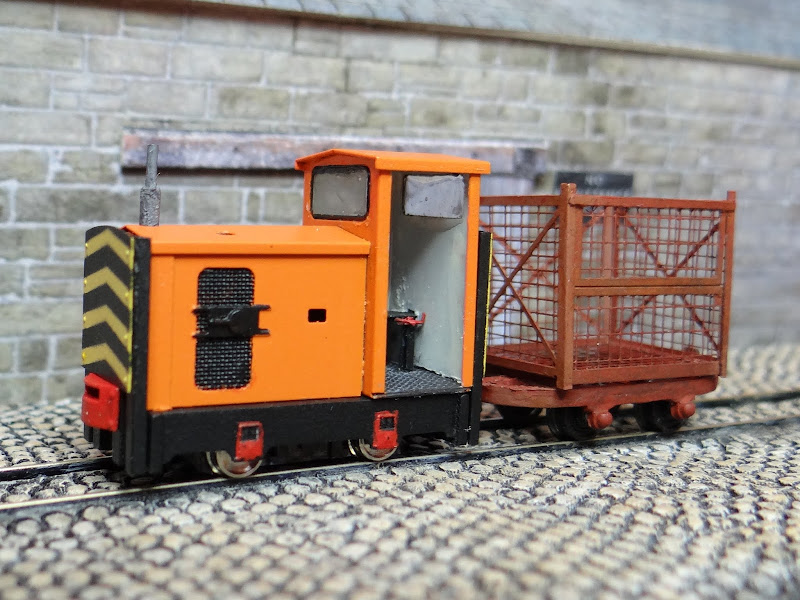
If anyone is interested in more details then I wrote a nice long article, complete with drawings, which appeared in issue 119 of Narrow Gauge & Industrial Railway Modelling REVIEW in July last year. That issue actually contained two articles from me (and two separate reviews as well) because in co-operation with Alan Keef (yes the founder of Alan Keef Ltd. and the man behind the design and build of the K12 locomotives) I wrote an article discussing the six original K12 locomotives (there were actually seven in total but the last one was a bit different and we managed to miss including it).
Oh, and of course if you want your own 4mm scale K12 locomotive, then it's available as a kit in both OO9 and OO6.5 from Narrow Planet.
We last looked at the Alan Keef Ltd K12 diesel locomotive I was building all the way back in March of 2019 when I explained the origami required to turn the flat etched parts into the bonnet and cab. Having successfully (on the third attempt) designed the etched parts I was able to finally build and paint a complete model; and I'm still really quite impressed with the stencil idea for the wasp stripes!


And here it is posed on my tiny photo plank with the etched peat wagon I started working on at roughly the same time as the locomotive.
If anyone is interested in more details then I wrote a nice long article, complete with drawings, which appeared in issue 119 of Narrow Gauge & Industrial Railway Modelling REVIEW in July last year. That issue actually contained two articles from me (and two separate reviews as well) because in co-operation with Alan Keef (yes the founder of Alan Keef Ltd. and the man behind the design and build of the K12 locomotives) I wrote an article discussing the six original K12 locomotives (there were actually seven in total but the last one was a bit different and we managed to miss including it).
Oh, and of course if you want your own 4mm scale K12 locomotive, then it's available as a kit in both OO9 and OO6.5 from Narrow Planet.
Tuesday, March 12, 2019
Alan Keef K12 Diesel: Origami
The K12 diesel loco features the most complex etch parts I've ever drawn up. The first version was complex enough, but once I'd realised that I'd got the bonnet side panels wrong they become even more complex. The problem is that there are two many layers involved to be able to etch the bonnet as once simple piece. What I eventually came up with is this odd shaped piece.

What you are looking at on that side of the part is the inside of the bonnet front, but the outside of the side panels. You can see two etched rebates down the sides of the bonnet front into which the detailed etched side panels will fit so that they correctly fit behind the front wrap-around.
To bend this part to shape we start by doing something odd; folding the part the wrong way. Usually you fold a part so that the half-etched line is on the inside of the fold. In this case though, to make sure the parts will lay flat against each other, we bend it so that the etched line is on the outside of the fold. Here you can see this half way through being folded flat fro both sides; note I've coloured in the rebates using a permanent marker to both highlight them and to stop glue filling them in.


Adding a small amount of glue next to the rebates and into the fold line, and completing the fold to squash the parts flat results in this slightly more normal looking piece, where the outside of both the front and sides are now on the same side of the part.

What you'll notice though is that there is metal behind the peak of the bonnet front which is clearly wrong. If we flip the part over it's easy to fold this part and snap it off; it was a sacrificial piece designed to strengthen the part during the initial folds and to ensure both sides were folded equally.


We now have an almost normal looking part which simply folds along the sides of the bonnet front.

After assembling the cab and attaching the bonnet to it, the detailed side panels then simply slot into the half etched rebates behind the front wrap-around and glued into place.


As I said, it's by far the single most complex etched part I've ever drawn, but it's both easy to assemble and allows me to accurately represent the prototype so I think that was a success, even if it did take me three attempts to get it right!

What you are looking at on that side of the part is the inside of the bonnet front, but the outside of the side panels. You can see two etched rebates down the sides of the bonnet front into which the detailed etched side panels will fit so that they correctly fit behind the front wrap-around.
To bend this part to shape we start by doing something odd; folding the part the wrong way. Usually you fold a part so that the half-etched line is on the inside of the fold. In this case though, to make sure the parts will lay flat against each other, we bend it so that the etched line is on the outside of the fold. Here you can see this half way through being folded flat fro both sides; note I've coloured in the rebates using a permanent marker to both highlight them and to stop glue filling them in.


Adding a small amount of glue next to the rebates and into the fold line, and completing the fold to squash the parts flat results in this slightly more normal looking piece, where the outside of both the front and sides are now on the same side of the part.

What you'll notice though is that there is metal behind the peak of the bonnet front which is clearly wrong. If we flip the part over it's easy to fold this part and snap it off; it was a sacrificial piece designed to strengthen the part during the initial folds and to ensure both sides were folded equally.


We now have an almost normal looking part which simply folds along the sides of the bonnet front.

After assembling the cab and attaching the bonnet to it, the detailed side panels then simply slot into the half etched rebates behind the front wrap-around and glued into place.


As I said, it's by far the single most complex etched part I've ever drawn, but it's both easy to assemble and allows me to accurately represent the prototype so I think that was a success, even if it did take me three attempts to get it right!
Tuesday, March 5, 2019
Alan Keef K12 Diesel: Third Time's A Charm
So late last week the third version of the body etches for the K12 arrived back. If you remember I needed a third go at the body etches having messed up the bonnet side panels (specifically how the fit against the wrap around of the bonnet front) in different ways on the first two attempts. Happy to say that this time I've nailed it.

Still got to add the details and paint it, but I'm really happy with how it's looking now.

Still got to add the details and paint it, but I'm really happy with how it's looking now.
Thursday, February 14, 2019
Howard Rotovator Orange
While waiting on the next set of test etches for the K12 loco I've been figuring out what paints to use to finish the model. I know that the locos were originally painted in something called "Howard Rotovator Orange" and apparently the closes match Alan Keef Ltd could find to that paint in a standard scheme is RAL 2004.
A number of ranges of model paint include an orange which is supposedly RAL 2004, and while I did contemplate airbrushing the model, it turned out I already had an aerosol can of Humbrol 18 Orange Gloss in stock which also turns out to be RAL 2004.
While I don't have the final model yet, I do have the first one I built that has the wrong bonnet side panels so I decided to practice on that.

A few minutes stood outside the back door sorted both the orange and the black for the chassis. The rest of the details, and the cab interior, were then brush painted. It's not quite as bright as the photo makes out and a little gentle weathering will help tone it down further, but I'm really quite happy with that.
A number of ranges of model paint include an orange which is supposedly RAL 2004, and while I did contemplate airbrushing the model, it turned out I already had an aerosol can of Humbrol 18 Orange Gloss in stock which also turns out to be RAL 2004.
While I don't have the final model yet, I do have the first one I built that has the wrong bonnet side panels so I decided to practice on that.

A few minutes stood outside the back door sorted both the orange and the black for the chassis. The rest of the details, and the cab interior, were then brush painted. It's not quite as bright as the photo makes out and a little gentle weathering will help tone it down further, but I'm really quite happy with that.
Friday, January 11, 2019
Alan Keef K12 Diesel: Part 2
Whilst I soon realised on Wednesday that I'd messed up the etches for the K12 I pushed on to assemble as much as I could in order to check the rest of the parts. Rather than building up another OO9 version, this time I've built one for OO6.5 around the a Busch chassis.

Apart from the known issues everything seems to have gone together well. I did have a few issues assembling the parts due to not spotting a slight issue with the chassis which caused the cab to fall apart, but that wasn't down to a problem with the parts. The only downside to this version is that the chassis is much taller than the OO9 version meaning it fills most of the cab. Hopefully when painted and with a driver stood in the door way this shouldn't be too obvious.
I don't really have anywhere to test 6.5mm gauge models (yet) so a battery and a short straight piece of track had to suffice, but I think it looks quite good with the peat wagon.

Apart from the known issues everything seems to have gone together well. I did have a few issues assembling the parts due to not spotting a slight issue with the chassis which caused the cab to fall apart, but that wasn't down to a problem with the parts. The only downside to this version is that the chassis is much taller than the OO9 version meaning it fills most of the cab. Hopefully when painted and with a driver stood in the door way this shouldn't be too obvious.
I don't really have anywhere to test 6.5mm gauge models (yet) so a battery and a short straight piece of track had to suffice, but I think it looks quite good with the peat wagon.
Thursday, January 10, 2019
One Right, One Wrong
So yesterday I grabbed a few minutes here and there to have a look at the new prototypes. First up was the revised peat wagon etches

On the left we have the previous OO6.5 gauge prototype that was very awkward to assemble. On the right the new prototype etched cage this time assembled onto a Dundas Models rugga chassis for OO9. The good news is that the new parts are much much easier to assemble, and once assembled are indistinguishable from the previous version, so I'm calling that a success. That means these should hopefully appear as kits in both gauges before too long.
Flushed with success I moved on to having a look at the new etches for the K12 loco. Unfortunately on the very first piece I removed from the fret I've found a mistake; a half etched rebate is on the wrong side of the sheet. Checking the artwork and the mistake is definitely of my own making, which is rather frustrating. In my defence it's on a rather complex part that involves two normal fold lines and an underfold and I simply got confused as to which side ended up where on the folded part. Fortunately with the artwork being digital it's easy to correct; I can't imagine how people stayed sane correcting hand-drawn etch artwork! I'm going to assemble as much of the model as I can to check the rest of the parts, but it's going to need another round of prototyping before it's finished.

On the left we have the previous OO6.5 gauge prototype that was very awkward to assemble. On the right the new prototype etched cage this time assembled onto a Dundas Models rugga chassis for OO9. The good news is that the new parts are much much easier to assemble, and once assembled are indistinguishable from the previous version, so I'm calling that a success. That means these should hopefully appear as kits in both gauges before too long.
Flushed with success I moved on to having a look at the new etches for the K12 loco. Unfortunately on the very first piece I removed from the fret I've found a mistake; a half etched rebate is on the wrong side of the sheet. Checking the artwork and the mistake is definitely of my own making, which is rather frustrating. In my defence it's on a rather complex part that involves two normal fold lines and an underfold and I simply got confused as to which side ended up where on the folded part. Fortunately with the artwork being digital it's easy to correct; I can't imagine how people stayed sane correcting hand-drawn etch artwork! I'm going to assemble as much of the model as I can to check the rest of the parts, but it's going to need another round of prototyping before it's finished.
Wednesday, January 9, 2019
New Year, New Prototypes
It's been quite a while since I had any modelling to show while I updated the designs for the K12 loco and peat wagons I was working on back in November. Well hopefully that will all soon change and I'll have something new to tell you.

The 3D printed parts turned up just before Christmas, while the revised etched parts dropped through the letterbox this morning. First glance and everything looks good, so fingers crossed...

The 3D printed parts turned up just before Christmas, while the revised etched parts dropped through the letterbox this morning. First glance and everything looks good, so fingers crossed...
Monday, November 19, 2018
Wasp Stripes: An Experiment
I hate the idea of wasps. Not only do I not like the variety that sting, but the idea of trying to mask up a locomotive to paint on wasp stripes fills me with dread, especially given the smaller scales I usually model in. One of the K12 diesel locomotives was fitted with extra plating that was painted with wasp stripes and while I wanted to be able to model that I didn't think it was going to be possible to mask the parts for painting on wasp stripes, so as a bit of an experiment I included a stencil on the test etch.
I spent a few minutes (spread over a few hours) this morning trying it out. The steps were easy enough; spray the part with primer, spray with yellow paint, stick the part to the back of the stencil using masking tape, spray with black paint, and finally remove the stencil. In theory there is only about five minutes of modelling there but you need to wait for the paint to dry (enough) at each step. The process was frustrated slightly as the can of yellow paint I had seems to have gone off so it didn't cover very well, but I think this proves that I can paint wasp stripes that are good enough.

I'll admit that it's not perfect (I didn't let the yellow full harden so it's bunched up a little around the rivet detail, and it may need a touch more black) but I'm more than happy with how it looks. Don't forget the picture is many times life size, and to the naked eye it looks spot on.
I spent a few minutes (spread over a few hours) this morning trying it out. The steps were easy enough; spray the part with primer, spray with yellow paint, stick the part to the back of the stencil using masking tape, spray with black paint, and finally remove the stencil. In theory there is only about five minutes of modelling there but you need to wait for the paint to dry (enough) at each step. The process was frustrated slightly as the can of yellow paint I had seems to have gone off so it didn't cover very well, but I think this proves that I can paint wasp stripes that are good enough.

I'll admit that it's not perfect (I didn't let the yellow full harden so it's bunched up a little around the rivet detail, and it may need a touch more black) but I'm more than happy with how it looks. Don't forget the picture is many times life size, and to the naked eye it looks spot on.
Sunday, November 11, 2018
Alan Keef K12 Diesel: Part 1
Having built the peat wagon I had a go at assembling the parts on the other etch, which turned into.......

You can probably see in the photo that the etch and 3D printed chassis are just slotted together, but hopefully some of you will recognise the loco as a K12 diesel built by Alan Keef Ltd. While I've managed to assemble all the parts around a KATO Centram chassis, I need to make changes to both the etch and the 3D print; there are a few niggling issues but more importantly I managed to mess up the design of the bonnet side panels by misinterpreting the drawings I was working from.
Even though there are issues with the model I think it looks the part, and I'm really happy with the fact that all the complex folds on the etch worked perfectly. It might be a while before I have more progress to show, so while you wait here's a short video of it circling my tiny test track:

You can probably see in the photo that the etch and 3D printed chassis are just slotted together, but hopefully some of you will recognise the loco as a K12 diesel built by Alan Keef Ltd. While I've managed to assemble all the parts around a KATO Centram chassis, I need to make changes to both the etch and the 3D print; there are a few niggling issues but more importantly I managed to mess up the design of the bonnet side panels by misinterpreting the drawings I was working from.
Even though there are issues with the model I think it looks the part, and I'm really happy with the fact that all the complex folds on the etch worked perfectly. It might be a while before I have more progress to show, so while you wait here's a short video of it circling my tiny test track:
Subscribe to:
Posts (Atom)