Having come up with a second way of producing the heather flowers I've now applied this to the complete diorama which gives me this.
As you can easily see, in comparison to the heather on Bobby's photos mine is way too purple and in some lights almost blue. Now given the varying colours that heather does flower I could probably have got away with this but I decided I really did want to try and make it a little pinker.
The solution was another round of flowers again based on the Woodland Scenics purple flowering foliage. I took some of the purple flowers I'd mixed with the white weathering powder and shook them with some ground up pink pastel (from a metal tin of Reeves Greyhound pastels that are probably at least twice as old as me). A small amount of scenic glue was then dabbed onto the existing heather flowers before a small amount of the pinker flowers were added. The result is, I hope you will agree, much better.
And now that the heather is flowering the model is essentially finished. I just have to glue the bike in place and tidy up the base to improve the presentation. Both of these need to be done in the next few days before I pack the model ready for travelling down to ExpoNG on Friday. I'll post lots of photos of the finished model after the competition, so if you want to see it before then how about coming to say hello on Saturday -- you'll probably be able to find me at the Narrow Planet stand.
Showing posts with label landscaping. Show all posts
Sunday, October 25, 2015
Friday, October 23, 2015
A Small Earthquake?
Reports have been coming in that a small earthquake struck just outside Glasgow this morning resulting in some minor earth movements.
Ever since I built the model of Bobby's bike, I've been annoyed by the fact that I hadn't quite got the ground around the abutment right, which meant that the embankment looked a lot taller compared to the bike than it should do. This morning I had another look and decided I just couldn't live with it any longer. Fortunately raising the ground level with a little DAS clay was easy as was blending it into the vegetation I'd already added. It's still not perfect but I think it looks a lot closer to reality now which is the main thing.
Monday, October 19, 2015
Calluna Reducere
So having decided that my approach to modelling heather didn't actually work I was pretty much resigned to the fact that I'd have to go without flowers on the heather, but then I had a flash of inspiration and decided it was worth having one more go.
When I first started thinking about modelling heather I'd looked at using the Woodland Scenics purple flowering foliage. I quickly ruled it out for two reasons. Firstly the strands that the flowers are attached to tend stick out at odd annoying angles no matter how much glue you use. More importantly while the purple looks bright and vibrant in a clump once teased out to cover a dark green bush it is actually quite dark. Obviously the first problem can be dealt with by removing the flowers from the strands but I still discounted it because of the colour.
My moment of inspiration came late on yesterday when I was using some dark earth weathering powder to slightly tone down a bright green grass tuft; if I can make a grass tuft darker using a weathering powder why couldn't I lighten the purple flowers in a similar way? So I took a small box, some white weathering powder, some purple flowers (removed from the strands) and made a martini!
Making heather was then a case of painting a small amount of glue onto a bush and sprinkling on some of the lightened flowers. I also added a few of the dark purple flowers to add a little variety. The excess was then blown of and voila we have heather. In real life it looks even better as the camera makes it look a lot bigger than it really is.
When I first started thinking about modelling heather I'd looked at using the Woodland Scenics purple flowering foliage. I quickly ruled it out for two reasons. Firstly the strands that the flowers are attached to tend stick out at odd annoying angles no matter how much glue you use. More importantly while the purple looks bright and vibrant in a clump once teased out to cover a dark green bush it is actually quite dark. Obviously the first problem can be dealt with by removing the flowers from the strands but I still discounted it because of the colour.
My moment of inspiration came late on yesterday when I was using some dark earth weathering powder to slightly tone down a bright green grass tuft; if I can make a grass tuft darker using a weathering powder why couldn't I lighten the purple flowers in a similar way? So I took a small box, some white weathering powder, some purple flowers (removed from the strands) and made a martini!
Making heather was then a case of painting a small amount of glue onto a bush and sprinkling on some of the lightened flowers. I also added a few of the dark purple flowers to add a little variety. The excess was then blown of and voila we have heather. In real life it looks even better as the camera makes it look a lot bigger than it really is.
Saturday, October 17, 2015
Bloomin' Heather!
Since the last post I've now added the two base layers of static grass to the entire diorama and started to add the heather bushes. The third layer of static grass will be added when the heather is in place to fill the grassy gaps. I'm going to hold off on showing the current states for now, but Bryony thought it looked so good that she wondered if I really should add the purple heather flowers as she was worried I'd ruin it. So that meant I had to expand on my previous small heather experiment to see how a bigger area would look.
Personally I think this looks horrible which is a shame as I thought the small experiment showed promise. So unless I come up with another approach for doing heather flowers in the next ten days then I'm going to leave them off and assume that the diorama represents a time of the year before the heather flowers. I guess you might call that cheating, but I'd prefer to leave the flowers off than completely ruin the model.
Monday, October 12, 2015
The First Signs of Spring
Now that I'm happy with the concrete block the next stage is the greenery. I've started to work on this around the concrete block as this area is partly under the bridge and will be very difficult to get to, with the static grass tool, once the bridge is fixed in place. I'd done a number of small experiments before I started but this is how it looks at the moment; it's not a perfect match to the real location but I don't think it's too far off.
While it looks fairly simple it actually takes quite a while as there are a number of different stages involved. Firstly I applied some War World Scenics 1mm summer static grass. Once the glue had dried I dribbled on some more PVA and did a second application of the same grass to help build up a bit of depth. I then stuck a single mixed green Gamer's Grass tuft into the corner of the abutment. At this point it looked reasonable but I wanted a little more variation so I added some Woodland Scenics medium green static grass. I didn't add this in the normal way though, I used the "cigarette" approach described by Giles Favell in Model Railway Journal No. 238 to give clumps of grass.
Looking at the photo I could possibly do with reducing the size of the grass tuft slightly but in general I think that looks pretty good so I can now move on to adding grass to the rest of the diorama and fixing the bridge into place.
While it looks fairly simple it actually takes quite a while as there are a number of different stages involved. Firstly I applied some War World Scenics 1mm summer static grass. Once the glue had dried I dribbled on some more PVA and did a second application of the same grass to help build up a bit of depth. I then stuck a single mixed green Gamer's Grass tuft into the corner of the abutment. At this point it looked reasonable but I wanted a little more variation so I added some Woodland Scenics medium green static grass. I didn't add this in the normal way though, I used the "cigarette" approach described by Giles Favell in Model Railway Journal No. 238 to give clumps of grass.
Looking at the photo I could possibly do with reducing the size of the grass tuft slightly but in general I think that looks pretty good so I can now move on to adding grass to the rest of the diorama and fixing the bridge into place.
Sunday, October 11, 2015
A Second Concrete Block
I had a plan for today that involved starting on the greenery. Before that though I had to glue the concrete block into place and then blend it with the rest of the abutment. This was fairly straightforward. Unfortunately I took one look at it once completed and decided it had to go.
The problem was that I made the concrete block before I had more accurate measurements courtesy of Bobby's trip out to the bridge. This meant that the block was too narrow and when fitted in place there were two steps as the embankment narrowed rather than just one. Originally I thought I'd be able to love with it but once I could see everything blended it was just wrong so it had to go. Of course by this point the block was glued and plastered into place so took a bit of getting off.
I've now cast another, wider, block. In fact I've cast a block that is slightly wider than the real one so that it better matches the rest of the embankment and stonework that I'd already built.
Personally I think that looks like a fairly good representation, but it does mean that I still haven't done any greenery yet.
The problem was that I made the concrete block before I had more accurate measurements courtesy of Bobby's trip out to the bridge. This meant that the block was too narrow and when fitted in place there were two steps as the embankment narrowed rather than just one. Originally I thought I'd be able to love with it but once I could see everything blended it was just wrong so it had to go. Of course by this point the block was glued and plastered into place so took a bit of getting off.
I've now cast another, wider, block. In fact I've cast a block that is slightly wider than the real one so that it better matches the rest of the embankment and stonework that I'd already built.
Personally I think that looks like a fairly good representation, but it does mean that I still haven't done any greenery yet.
Saturday, October 10, 2015
Convex Falls
So having added some surface texture to the water I decided that I still wasn't happy with the stream, specifically the small fall.
The main problem I had with the fall was that the water was following the rock surface, which doesn't happen in real life. In reality water erodes the rock from the top of the fall downwards resulting in the rock having a conave surface, i.e. it drops down before going outwards. Water flowing over the rock though forms a convex shape as the momentum carries it out before gravity pulls it down. With my water following the rock it didn't shoot out enough.
My first thought was to try and build up the water using the Woodland Scenics water effects but I decided I wanted something that naturally had some colour to it and the water effects dries clear. My solution was cotton wool.
So I took a small piece of a cotton wool ball and gently teased it out trying to keep the threads all running in one direction so that they could represent individual falls of water. I then gently tapped this to a bit of folded metal to make it easier to hold before gently wafting on some matt varnish. Once the varnish has dried the teased out cotton wool keeps it's shape remarkably well but still looks nothing like water so the last stage is to paint on a thin layer of the Woodland Scenics realistic water. Once this dries it goes clear leaving a thin film of water with white highlights inside it rather than being painted on the top. A small piece of this is then cut to shape and essentially glued in place using small amounts of water effects which then add more turbulence to blend in the edges.
I think this looks much better than the old falls, although in retrospect I should probably have used a couple of small strips to match the lip of the fall rather than shaping a single piece but I'm not going to try changing it now.
The main problem I had with the fall was that the water was following the rock surface, which doesn't happen in real life. In reality water erodes the rock from the top of the fall downwards resulting in the rock having a conave surface, i.e. it drops down before going outwards. Water flowing over the rock though forms a convex shape as the momentum carries it out before gravity pulls it down. With my water following the rock it didn't shoot out enough.
My first thought was to try and build up the water using the Woodland Scenics water effects but I decided I wanted something that naturally had some colour to it and the water effects dries clear. My solution was cotton wool.
So I took a small piece of a cotton wool ball and gently teased it out trying to keep the threads all running in one direction so that they could represent individual falls of water. I then gently tapped this to a bit of folded metal to make it easier to hold before gently wafting on some matt varnish. Once the varnish has dried the teased out cotton wool keeps it's shape remarkably well but still looks nothing like water so the last stage is to paint on a thin layer of the Woodland Scenics realistic water. Once this dries it goes clear leaving a thin film of water with white highlights inside it rather than being painted on the top. A small piece of this is then cut to shape and essentially glued in place using small amounts of water effects which then add more turbulence to blend in the edges.
I think this looks much better than the old falls, although in retrospect I should probably have used a couple of small strips to match the lip of the fall rather than shaping a single piece but I'm not going to try changing it now.
Wednesday, October 7, 2015
Textured Water
So having said in the previous post that I was going to leave the water alone, I've gone ahead and changed my mind. After more thought I decided that the smooth surface was just way too smooth and almost any texture would be an improvement. So I took the approach that worked best in my experiments (a cotton wool bud to apply the Woodland Scenics Water Effects) and attacked the stream.
Once the water effects had cured I re-applied the extra details on the fall etc. and dry brushed on some ivory paint to highlight certain areas. It's not perfect but I think it looks a lot better than the very smooth surface. Hopefully you all agree?
Sunday, October 4, 2015
White Water Effects
It's been two weeks now since I last posted about the small diorama I'm building for the Dave Brewer Challenge, and almost nothing has changed. The problem has been trying to figure out how to finish the water as I can't fix the bridge in place until that is done, and the rails need to be down before I can start adding ground cover.
My initial plan had been to add ripples across the whole surface of the stream to help show that the water was flowing across the diorama. Unfortunately I had no idea how to do this so I set about experimenting. I've now done four or five experiments and I'm not happy with any of the results. The problem is that at 4mm to the foot ripples need to be small so that they don't look like huge waves and I can't work out how to do this. I have figured out some nice approaches if I ever need a 7mm to the foot stream though so it's not been a complete waste of time.
What this means is that I'm going to leave most of the stream surface alone just adding small amounts of effects where it flows over rocks etc. to produce more white, turbulent water. I've approached this in small stages and currently this is what I have.
I think I probably need to add a little more to this but in principal it looks okay, especially as the stream surface isn't totally flat anyway. As you can see I've also painted the ground where grass and heather will appear. So the next step is a little more water effects before I get the bridge fully incorporated into the scene.
My initial plan had been to add ripples across the whole surface of the stream to help show that the water was flowing across the diorama. Unfortunately I had no idea how to do this so I set about experimenting. I've now done four or five experiments and I'm not happy with any of the results. The problem is that at 4mm to the foot ripples need to be small so that they don't look like huge waves and I can't work out how to do this. I have figured out some nice approaches if I ever need a 7mm to the foot stream though so it's not been a complete waste of time.
What this means is that I'm going to leave most of the stream surface alone just adding small amounts of effects where it flows over rocks etc. to produce more white, turbulent water. I've approached this in small stages and currently this is what I have.
I think I probably need to add a little more to this but in principal it looks okay, especially as the stream surface isn't totally flat anyway. As you can see I've also painted the ground where grass and heather will appear. So the next step is a little more water effects before I get the bridge fully incorporated into the scene.
Sunday, September 20, 2015
Realistic (Blacketty) Water
It's been a while since you last saw the actual diorama as I've been slowly adding the water for the stream. I've lost count of the number of layers I've poured (I think six but I could be wrong) but it's finally at a reasonable depth, both in terms of resin and how it looks.
Rach layer was very thin (about 5ml per layer across the entire scene) and then painted with thin washes of black and burnt umber to try and add depth. I also had the model resting on an angle for the entire duration so that the stream surface was kept horizontal. This means that now that it is dry it looks like it's flowing downhill. The main problem of course is that the surface is too smooth and looks like slow moving water rather than a fast flowing stream. Hopefully some Woodland Scenics water effects should solve that problem though.
Friday, September 18, 2015
Rusty Girders
Over the last few days I've done a little more work on the girders etc. that make up the bulk of the bridge. After posting about this previously I realised I'd missed out the bolts that connect the girders to the concrete block so these have now been added (a small piece of folded brass and more rod for the bolts) and then the whole thing painted.
On the real thing the plates are a lot darker than the girders which I've attempted to replicate. I'm fairly happy with how it looks although it will get a little more weathering when it's bedded into the scene to help tie the bits together.
Thursday, September 17, 2015
Flutterby Chunky
If you've been following this blog for any length of time you'll have noticed that my modelling tends to focus on the man made aspects of a railway (locomotives, rolling stock, bridges, etc.) rather than the natural environment it runs through. One of my main reasons for entering the Dave Brewer challenge this year was to force me into thinking about the scenery around the bridge and so far it seems to have worked. I've experimented with lots of different approaches to painting rocks as well as figuring out how to model dark peaty water (which I promise I will come back to soon). The third major part of the scenery on the diorama is the heather and this has had me worried for a while.
I'd looked at a number of really nice commercial grass mats but none really matched the scenery around the real bridge well enough for me to be happy with, partly as I couldn't find a good representation of the heather. While I still need to decided exactly how I'm going to do the bits of grass not covered by heather (probably a mixture of scatter and static grass) I think, after a number of experiments, that I now have a good way of producing heather.
My first attempt at heather involved using some Woodland Scenics forest blend bushes covered in scatter. Having seen other people have good results using Flower Soft to represent.... flowers and given that they do a packet called heather this seemed like a good starting point. While the colour in the packet looks okay there was quite a lot of white bits that I wasn't happy with as I thought they would be too bright. Given the others colours seemed reasonable I picked out the white bits and then scattered the other bits over a bush covered in glue, and you can see this on the left hand side of the first photo. Unfortunately I think you'll all agree that this doesn't look like heather. The bits are too big (the bush is a reasonable size for the scale I'm working in) and the colours are wrong.
To try and fix at least the size issue I tried again this time with some Ultra Fine Flower Soft called Raspberry Fizz (strangely the Ultra Fine stuff no longer seems to be listed on the website). Unfortunately again there is too much white and this time the bits are so small I couldn't remove them, so I think it looks even worse (right hand side of the first photo).
At this point I was fairly stumped. I knew, from the photos I have of the bridge, roughly what colour the heather should be but I had no idea how to make it. Fortunately my wife had an idea that seems to have worked really well; she suggested I use some chenille. Now given that she has been buying chenille so she can crochet baby blankets I wasn't initially convinced by the idea but she was convinced that chopping the fibres up into little pieces should work so I gave it a go. My first attempt was horrible as the bits of yarn, while the right colour, was way too fluffy. For a second attempt I dunked a piece of yarn in scenic cement and left it to dry before cutting it up and this seems to have reduced the fluffiness to acceptable levels.
Now in close up you might not be convinced that it looks like heather, but if you stand back and look at it from a slightly more sensible distance I think it does a very good job. Yes I could do with separating the fibres a little more so it doesn't clump but in general I'm really happy with how it looks.
For anyone wanting to try and replicate the idea I used James C. Brett Flutterby Chunky yarn, mostly the Mulberry (B21) but also a little Rose Pink (B19) to give a little variation.
I'd looked at a number of really nice commercial grass mats but none really matched the scenery around the real bridge well enough for me to be happy with, partly as I couldn't find a good representation of the heather. While I still need to decided exactly how I'm going to do the bits of grass not covered by heather (probably a mixture of scatter and static grass) I think, after a number of experiments, that I now have a good way of producing heather.
My first attempt at heather involved using some Woodland Scenics forest blend bushes covered in scatter. Having seen other people have good results using Flower Soft to represent.... flowers and given that they do a packet called heather this seemed like a good starting point. While the colour in the packet looks okay there was quite a lot of white bits that I wasn't happy with as I thought they would be too bright. Given the others colours seemed reasonable I picked out the white bits and then scattered the other bits over a bush covered in glue, and you can see this on the left hand side of the first photo. Unfortunately I think you'll all agree that this doesn't look like heather. The bits are too big (the bush is a reasonable size for the scale I'm working in) and the colours are wrong.
To try and fix at least the size issue I tried again this time with some Ultra Fine Flower Soft called Raspberry Fizz (strangely the Ultra Fine stuff no longer seems to be listed on the website). Unfortunately again there is too much white and this time the bits are so small I couldn't remove them, so I think it looks even worse (right hand side of the first photo).
At this point I was fairly stumped. I knew, from the photos I have of the bridge, roughly what colour the heather should be but I had no idea how to make it. Fortunately my wife had an idea that seems to have worked really well; she suggested I use some chenille. Now given that she has been buying chenille so she can crochet baby blankets I wasn't initially convinced by the idea but she was convinced that chopping the fibres up into little pieces should work so I gave it a go. My first attempt was horrible as the bits of yarn, while the right colour, was way too fluffy. For a second attempt I dunked a piece of yarn in scenic cement and left it to dry before cutting it up and this seems to have reduced the fluffiness to acceptable levels.
Now in close up you might not be convinced that it looks like heather, but if you stand back and look at it from a slightly more sensible distance I think it does a very good job. Yes I could do with separating the fibres a little more so it doesn't clump but in general I'm really happy with how it looks.
For anyone wanting to try and replicate the idea I used James C. Brett Flutterby Chunky yarn, mostly the Mulberry (B21) but also a little Rose Pink (B19) to give a little variation.
Monday, August 31, 2015
Dry Land
So a little bit of paint later and I now have rocks and a stream bed. I'll extend the peat colouring onto the banks to give a base for the plants but for now this makes it clear where the stream runs.
From this angle the lack of depth to the diorama is more obvious as the land doesn't rise up behind the bridge as it does in real life but I think it looks pretty close all the same. Next up will be pouring the water which will take a few days to do the layers so it's unlikely there will be a progress report until I have something sensible to show.
Tuesday, August 25, 2015
Rocks and Rails
Just a quick update on the diorama, as I've now scribbed the stonework on the right-hand bridge support and cut the rails to length.
The rocks were scribbed into the plaster using a dental pick, which worked nicely. The pattern isn't fully accurate to the actual bridge but I think it should work reasonably well once painted up and part hidden under plants.
The ends of the rails are likely to be hidden where the track is over grown so I've soldered them to copperclad PCB strip for strength rather than relying on the hand spiked sleepers to hold everything in place. This should also make fitting the sleepers easier as the gauge is already set.
While neither of these tasks are huge in themselves, I do feel that the scene is starting to come together nicely now. I see I still have a bit of work to do where the girders join the left bank (that gap needs filling) before I start painting the rocks, but I can now also crack on with building the track and detailing the girders and those jobs should move the diorama forward quite quickly.
The rocks were scribbed into the plaster using a dental pick, which worked nicely. The pattern isn't fully accurate to the actual bridge but I think it should work reasonably well once painted up and part hidden under plants.
The ends of the rails are likely to be hidden where the track is over grown so I've soldered them to copperclad PCB strip for strength rather than relying on the hand spiked sleepers to hold everything in place. This should also make fitting the sleepers easier as the gauge is already set.
While neither of these tasks are huge in themselves, I do feel that the scene is starting to come together nicely now. I see I still have a bit of work to do where the girders join the left bank (that gap needs filling) before I start painting the rocks, but I can now also crack on with building the track and detailing the girders and those jobs should move the diorama forward quite quickly.
Saturday, August 22, 2015
More Civil Engineering
It was a long day for the civil engineering team yesterday up on the wilds of Duchal Moor. By the end of the day though they had managed to build up the embankment and cut two bridge girders to size. They expect to have to make a few minor adjustments as building work continues but so far it's all looking quite promising.
The next step will be to scrib the stonework into the supports for the right hand side of the bridge. On the real thing these appear to be made from large local stones bound together with concrete. I did think about producing individual stones from DAS (like I did with the dry stone wall) but I wanted to ensure that I could colour them the same as the in-situ rock. I made the supports by casting a large flat sheet of plaster which I then cut into the relevant shapes. These were glued in place then more plaster used to bind them all together and into the scenery. This means there is plenty of depth of plaster to scrib and they should take colour nicely.
Friday, August 21, 2015
Civil Engineering
The civil engineering team were out early up on Duchal Moor this morning. They've already made initial measurements and started construction on the core of the embankment that will carry the railway over Blacketty Water.
Wednesday, August 19, 2015
Terraforming at 75%
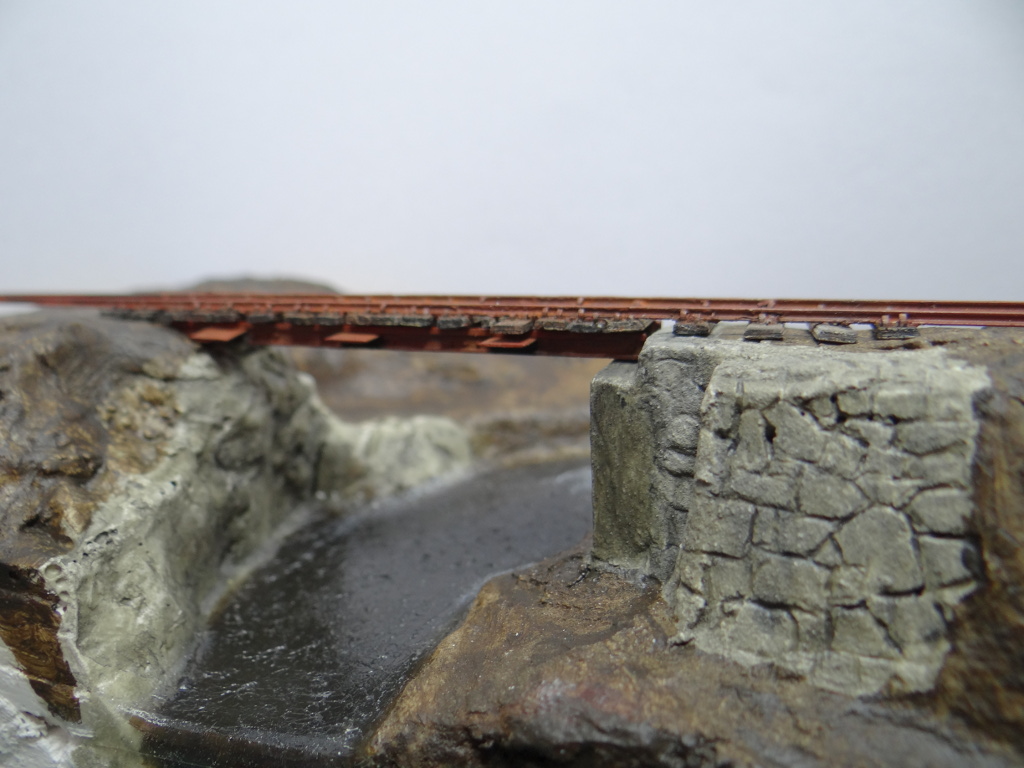
Now that I'm fairly confident about how I'm going to model the water for my Dave Brewer challenge entry, I've started work on the basic terrain of the final model. So far I'm at about 75% completed.
As you can see, so far I've modelled the river bed, with a drop for a small fall, and the left hand bank where the railway enters on top of a rock. The right hand bank, although taking up a smaller portion of the diorama, is more complex as it contains a man made embankment for the railway to run on. I have some ideas of how I'm going to build that up, but it still requires a little more thought before I make a start on it.
Sunday, November 9, 2014
Dry Stone Walling
Some of you may remember that back in March I built a couple of short sections of stone walling using brick papers from scalescenes.com. The first attempt was wrong as the stones were too big, and while the second attempt was better, the wall was just too flat with no relief. Having now abandoned brick papers for full structures in favour of embossed plastikard I decided I needed to have another go at building a stone wall. The result is this little test piece (using the driver from the Brian Madge Quarry Hunslet kit to give a sense of scale).
Personally I think this looks an order of magnitude better than my previous attempts. It did, however, taken an order of magnitude longer to produce as well. In fact that short piece of wall took all day, although some of that was waiting for DAS clay to dry. What you are looking at is a wall where each stone was cut and laid separately to produce a dry stone wall; albeit with PVA to keep the stones in place.
The technique I've used is based on Ian Nuttall's description of how he built dry stone walls for his layout (February 2013 edition of Railway Modeller). The idea is to create 6mm wide strips of DAS clay of varying heights that can be cut to make individual stones and used to model a 1' 6" wide wall. Rolling, measuring and and cutting DAS clay to the right sizes would be a pain, which is where the plastic tagliatelle comes in to play.
I built a jig from a sheet of 2mm plastikard and various sized square sections of plastruct. I used 1.5mm, 2mm, 2.5mm, 3.2mm, and 4mm sections to give five channels 6mm wide allowing me to model stones 4 1/2", 6", 7 1/2", 9 2/3" and 1' tall by simply pushing DAS into the channels of the jig. The problem is removing the DAS from the jig. The trick here is to place one of the plastic strips at the bottom of the channel, then add the DAS, and then just lift the plastic strip to remove the clay. Once the DAS has dried the plastic strip peels off easily and can be reused.
Once the clay strips have dried (I should possibly have left them a little longer but I was getting inpatient) they can be cut into individual stones; I found my track cutters worked really well for this bit. The wall is started by laying down a thin ribbon of PVA and placing the first course of stones. Small dabs of PVA are then used to add the further layers trying to avoid any leaking out the side of a join. I aimed for a level topped four foot high wall, before then adding the capping stones, which were slightly rounded, to give a wall approximately 4' 6" high. This seems to look about right next to the figure.
I painted the wall initially with RailMatch weathered stone (#2426) before giving the whole thing a black wash making sure to get the wash deep into the cracks where the base coat hadn't necessarily flowed. I then lightly dry brushed more weathered stone and some khaki (Model Color #988) to add a little variation. The final touch (which is mostly hidden behind the greenery) was to dry brush a little brown sand (Model Color #876) along the bottom of the wall to represent dirt having splashed up.
While the wall looked good at that point (I forgot to take any photos) I thought it was worth adding more scenery to see how it would look in the context of a layout rather than in isolation. I used some cheap burnt umber acrylic (I bought a large tube ages ago from WH Smiths) to provide a base colour and to hide the white cardboard. I then used Woodland Scenics green blend blended turf to provide ground cover before adding various shades of Woodland Scenics bushes and foliage clumps for bushes around the wall edges. The final touch was a little bit of yellow flowering foliage to the right side to add more colour.
Hopefully you will all agree that this looks a lot better than my previous brick paper attempts at making walls. Having said that it still isn't perfect, mostly as I think the proportion of large stones in the wall is too high; locally the walls are mostly small stones rather than large chunks. Changing the proportion of stone sizes though is easy so I think this is another scenic technique that I'm now happy with so another piece of the puzzle falls into place.
Personally I think this looks an order of magnitude better than my previous attempts. It did, however, taken an order of magnitude longer to produce as well. In fact that short piece of wall took all day, although some of that was waiting for DAS clay to dry. What you are looking at is a wall where each stone was cut and laid separately to produce a dry stone wall; albeit with PVA to keep the stones in place.
The technique I've used is based on Ian Nuttall's description of how he built dry stone walls for his layout (February 2013 edition of Railway Modeller). The idea is to create 6mm wide strips of DAS clay of varying heights that can be cut to make individual stones and used to model a 1' 6" wide wall. Rolling, measuring and and cutting DAS clay to the right sizes would be a pain, which is where the plastic tagliatelle comes in to play.
I built a jig from a sheet of 2mm plastikard and various sized square sections of plastruct. I used 1.5mm, 2mm, 2.5mm, 3.2mm, and 4mm sections to give five channels 6mm wide allowing me to model stones 4 1/2", 6", 7 1/2", 9 2/3" and 1' tall by simply pushing DAS into the channels of the jig. The problem is removing the DAS from the jig. The trick here is to place one of the plastic strips at the bottom of the channel, then add the DAS, and then just lift the plastic strip to remove the clay. Once the DAS has dried the plastic strip peels off easily and can be reused.
Once the clay strips have dried (I should possibly have left them a little longer but I was getting inpatient) they can be cut into individual stones; I found my track cutters worked really well for this bit. The wall is started by laying down a thin ribbon of PVA and placing the first course of stones. Small dabs of PVA are then used to add the further layers trying to avoid any leaking out the side of a join. I aimed for a level topped four foot high wall, before then adding the capping stones, which were slightly rounded, to give a wall approximately 4' 6" high. This seems to look about right next to the figure.
I painted the wall initially with RailMatch weathered stone (#2426) before giving the whole thing a black wash making sure to get the wash deep into the cracks where the base coat hadn't necessarily flowed. I then lightly dry brushed more weathered stone and some khaki (Model Color #988) to add a little variation. The final touch (which is mostly hidden behind the greenery) was to dry brush a little brown sand (Model Color #876) along the bottom of the wall to represent dirt having splashed up.
While the wall looked good at that point (I forgot to take any photos) I thought it was worth adding more scenery to see how it would look in the context of a layout rather than in isolation. I used some cheap burnt umber acrylic (I bought a large tube ages ago from WH Smiths) to provide a base colour and to hide the white cardboard. I then used Woodland Scenics green blend blended turf to provide ground cover before adding various shades of Woodland Scenics bushes and foliage clumps for bushes around the wall edges. The final touch was a little bit of yellow flowering foliage to the right side to add more colour.
Hopefully you will all agree that this looks a lot better than my previous brick paper attempts at making walls. Having said that it still isn't perfect, mostly as I think the proportion of large stones in the wall is too high; locally the walls are mostly small stones rather than large chunks. Changing the proportion of stone sizes though is easy so I think this is another scenic technique that I'm now happy with so another piece of the puzzle falls into place.
Wednesday, August 14, 2013
Drive Safely
Not a train, or railway, in sight in today's post. What you are looking at is the road leading away from the factory which bends to the right over the railway and out of Jerusalem. As you can see I've done some more scenic work, specifically hiding the end of the drystone wall and grassing the slope to the left of the road. The main new item is the speed limit sign. Unlike the "Beware of the Trains" sign, I bought this one which is from a set of pre-1960's road signs made by Ancorton Models.
Saturday, August 10, 2013
From Roots To Branches
Given that I'm not modelling a windswept Hebridean island (although there is at least one person who does) Jerusalem is going to need some trees. Now I've never been a fan of ready to plant trees. They are either conifers modelled as perfect cones or deciduous trees that look more like a green ball on a stick. Even the kits for building trees don't really inspire me; the trunk looks very plasticy and the resulting tree is still very regular looking. What I wanted was some straggly looking trees that were all different but similar.
I've recently been reading through John de Frayssinet's excellent Sceneic Modelling book in which he suggests using sagebrush to create very natural looking trees. Now firstly I don't have any sagebrush plants and secondly John models in 4mm to the foot, and so his trees would be a little big for Jerusalem. It did, however, get me thinking that maybe there was something in the garden that would work.
As this year we have had a reasonable summer we have done quite a bit of work in the garden. This has included removing a number of shrubs that had gone berserk at the back of the garden. I'm not entirely sure what the shrub is but it spreads by putting out underground runners and these runners, cut into bits, looked fairly tree like to my eyes. As the roots went into the recycling bin I cut off the bits that looked promising and left them to dry out. Once dry they were microwaved for about 30 seconds to make sure they (and anything on them) were very dead.
So, yesterday, armed with some dead roots, I set about making some trees. This is essentially a simple four step process, which you can probably figure out from these handy step by step illustrations.
Firstly you need to find the appropriate bits of root. Each root then has a pin inserted into its base to allow it to be easily added to the layout; I used some 0.6mm wire that I had laying around and drilled a 0.65mm hole in each root. The wire was fixed with a small dab of superglue and left to dry. Once the roots were ready I added them to a temporary base (just a push fit into a hole, no glue). The tops of the trees were then sprayed with a matt varnish (specifically Winsor & Newton Artists' Matt Varnish). This makes them very sticky at which point I rolled the tree in Woodland Scenics Medium Green Course Turf. I then allowed the varnish to dry before repeating the process at least once to add more body to the foliage. When I was happy with the tree I then sprayed it with varnish again and sprinkled over some Woodland Scenics Green Blend Blended Turf to add a little colour variation. If you ignore drying time each tree probably took less than five minutes to make.
Once the trees are fully dry I then touch up any areas of the trunk where the bark has rubbed off with small dabs of RailMatch acrylic Sleeper Grime which seems to match the trunk colour quite well. A small hole (0.65mm again) is then drilled in the layout and the tree carefully positioned. I'll probably glue the trees in eventually but for now they are just a push fit so that I can remove them to work on the grass underneath and around them. So here is another shot of the front right corner of the layout with the trees in place.
I've recently been reading through John de Frayssinet's excellent Sceneic Modelling book in which he suggests using sagebrush to create very natural looking trees. Now firstly I don't have any sagebrush plants and secondly John models in 4mm to the foot, and so his trees would be a little big for Jerusalem. It did, however, get me thinking that maybe there was something in the garden that would work.
As this year we have had a reasonable summer we have done quite a bit of work in the garden. This has included removing a number of shrubs that had gone berserk at the back of the garden. I'm not entirely sure what the shrub is but it spreads by putting out underground runners and these runners, cut into bits, looked fairly tree like to my eyes. As the roots went into the recycling bin I cut off the bits that looked promising and left them to dry out. Once dry they were microwaved for about 30 seconds to make sure they (and anything on them) were very dead.
So, yesterday, armed with some dead roots, I set about making some trees. This is essentially a simple four step process, which you can probably figure out from these handy step by step illustrations.
Firstly you need to find the appropriate bits of root. Each root then has a pin inserted into its base to allow it to be easily added to the layout; I used some 0.6mm wire that I had laying around and drilled a 0.65mm hole in each root. The wire was fixed with a small dab of superglue and left to dry. Once the roots were ready I added them to a temporary base (just a push fit into a hole, no glue). The tops of the trees were then sprayed with a matt varnish (specifically Winsor & Newton Artists' Matt Varnish). This makes them very sticky at which point I rolled the tree in Woodland Scenics Medium Green Course Turf. I then allowed the varnish to dry before repeating the process at least once to add more body to the foliage. When I was happy with the tree I then sprayed it with varnish again and sprinkled over some Woodland Scenics Green Blend Blended Turf to add a little colour variation. If you ignore drying time each tree probably took less than five minutes to make.
Once the trees are fully dry I then touch up any areas of the trunk where the bark has rubbed off with small dabs of RailMatch acrylic Sleeper Grime which seems to match the trunk colour quite well. A small hole (0.65mm again) is then drilled in the layout and the tree carefully positioned. I'll probably glue the trees in eventually but for now they are just a push fit so that I can remove them to work on the grass underneath and around them. So here is another shot of the front right corner of the layout with the trees in place.
Subscribe to:
Posts (Atom)