On reflection, and given the very helpful and constructive criticism from Paul and Iain, I've gone back and had a second go at rusting a bit of rail and girder. While the powder based approach might work well for rail dumped in a bog for a few years I admit that it wasn't so good at representing rusting surfaces which tend to discolour without such serious pitting.
On this second attempt I again started with red oxide primer and then started to add shading using the same paints as before. At this stage I wasn't entirely convinced that I was getting anywhere but the addition of some weathering powders (rust and dark earth) seems to have pulled things together nicely. Not only does the texture look more convincing but I think the colour is better as well. Hopefully you all agree?
This episode reinforces the main reason I enjoy blogging and getting comments; without Paul and Iain's feedback I may well have just continued with my first approach and the final model would have suffered as a result.
Showing posts with label RailMatch. Show all posts
Wednesday, July 8, 2015
Monday, July 6, 2015
Just Rust
I grabbed a few minutes today (spread out a bit) to have a crack at another experiment which I'll need for the bridge I'm planning for ExpoNG. I'm reasonably happy with adding rust as a detail to a model but I've never tried to paint an entire item completely rusty. There are plenty of rust coloured paints and washes available but the problem is you need texture as well as colour variation as a well rusted surface tends to be pitted. On the bridge I'm modelling there is quite a lot of rusty girders and flat-bottomed rail so I needed to experiment a little.
What you are looking at here is a piece of girder at the back (which is just 3.2mm tall) and a piece of code 60 rail at the front. Both have been treated in the same way. To get the pitted effect I first sprayed on a layer of red oxide primer before gently sprinkling on some light weight hydrocal casting powder (it was the finest stuff I had to hand that didn't want to clump) to the wet paint. I then knocked off most of the powder, allowed the paint to dry for a second or so and then sprayed a second layer of primer. This seems to give a really nice texture although I might have added a bit too much powder to the rail sides. Once this was all dry I liberally dabbed on some MIG Productions Standard Rust Effects which provided some nice variation in colouring and shading. I then dry-brushed on a small amount of RailMatch Light Rust (#2404), before some final dabs of a rust wash from Flory Models.
The photo is very unforgiving and from a normal viewing distance the texture is less pronounced and I'm fairly happy with how they look.
What you are looking at here is a piece of girder at the back (which is just 3.2mm tall) and a piece of code 60 rail at the front. Both have been treated in the same way. To get the pitted effect I first sprayed on a layer of red oxide primer before gently sprinkling on some light weight hydrocal casting powder (it was the finest stuff I had to hand that didn't want to clump) to the wet paint. I then knocked off most of the powder, allowed the paint to dry for a second or so and then sprayed a second layer of primer. This seems to give a really nice texture although I might have added a bit too much powder to the rail sides. Once this was all dry I liberally dabbed on some MIG Productions Standard Rust Effects which provided some nice variation in colouring and shading. I then dry-brushed on a small amount of RailMatch Light Rust (#2404), before some final dabs of a rust wash from Flory Models.
The photo is very unforgiving and from a normal viewing distance the texture is less pronounced and I'm fairly happy with how they look.
Friday, March 27, 2015
Figure Painting
As I've mentioned before I prefer painting things that are simple block colours, although I am now happy with my approach to painting weathered wood. Painting figures to look realistic is something I'm still not entirely happy with though.
Over the years I've actually painted quite a lot of figures, but these have been the slightly larger Warhammer miniatures from Games Workshop and I focused on painting Orcs and Goblins. While I learnt a number of useful techniques they don't necessarily help with painting human figures. Fortunately there are a myriad of tutorials on the web which I've now read through to come up with an approach that is fairly easy and seems to work reasonably well.
The main point many of the tutorials stress is that you are aiming for something that looks right from a sensible viewing distance, rather than something that looks good in a close up photo. This means that you can often leave out details such as eyes and lips etc. as they would be so small as to be invisible. This is very different from when I painted orcs and goblins where I deliberately painted large eyes to add that slightly demented look I was after. So as you can see the close up photo does make the painting look rather crude but when viewed from even just a foot or so away the effect seems to work. The main idea is to use block colours and then a brown wash (not black interestingly) to add shadows and some dry brushing for highlights.
For this specific model I went with a blue overalls effect and used Model Color acrylics throughout, except for his shoes which were painted with RailMatch weathered black (#2412). I started by painting the whole figure black (#70.950) I then painted the overalls with flat blue (#70.962), the shirt ivory (#70.918) and the exposed skin was painted with dark flesh (#70.927). I then made a thin wash of burnt umber (#70.941) and ran this over the entire model to help add shadows. I then tried lightly dry brushing with dark sand (#70.847), which is a creamy colour, to add some highlights but I felt this looked a bit unnatural so touched some bits back in with their original colours and then applied another wash of burnt umber. Once dry a light wafting of matt varnish sealed everything nicely.
As I said before the close up photo is very unflattering but when viewed from a sensible distance I think he looks quite good. Now I just have to paint a locomotive for him to drive around in.
Over the years I've actually painted quite a lot of figures, but these have been the slightly larger Warhammer miniatures from Games Workshop and I focused on painting Orcs and Goblins. While I learnt a number of useful techniques they don't necessarily help with painting human figures. Fortunately there are a myriad of tutorials on the web which I've now read through to come up with an approach that is fairly easy and seems to work reasonably well.
The main point many of the tutorials stress is that you are aiming for something that looks right from a sensible viewing distance, rather than something that looks good in a close up photo. This means that you can often leave out details such as eyes and lips etc. as they would be so small as to be invisible. This is very different from when I painted orcs and goblins where I deliberately painted large eyes to add that slightly demented look I was after. So as you can see the close up photo does make the painting look rather crude but when viewed from even just a foot or so away the effect seems to work. The main idea is to use block colours and then a brown wash (not black interestingly) to add shadows and some dry brushing for highlights.
For this specific model I went with a blue overalls effect and used Model Color acrylics throughout, except for his shoes which were painted with RailMatch weathered black (#2412). I started by painting the whole figure black (#70.950) I then painted the overalls with flat blue (#70.962), the shirt ivory (#70.918) and the exposed skin was painted with dark flesh (#70.927). I then made a thin wash of burnt umber (#70.941) and ran this over the entire model to help add shadows. I then tried lightly dry brushing with dark sand (#70.847), which is a creamy colour, to add some highlights but I felt this looked a bit unnatural so touched some bits back in with their original colours and then applied another wash of burnt umber. Once dry a light wafting of matt varnish sealed everything nicely.
As I said before the close up photo is very unflattering but when viewed from a sensible distance I think he looks quite good. Now I just have to paint a locomotive for him to drive around in.
Saturday, November 22, 2014
Painted Sheds
Having been side tracked by building some OO9 gauge track, I've finally gone back and painted the two N gauge sheds built from the Severn Models kit. Both models involved me trying a new technique in their painting.
I painted the walls and door of the wooden shed using my standard approach for aged wood which has worked well on the OO9 wagons I've recently been building. This seems to work well for N gauge buildings as well. When it came to the roof, however, I wasn't happy with the very flat look of painted brass. To add a little texture I painted it with RailMatch roof dirt and then blew on a small amount of polyfilla while the paint was still wet. Once the paint had dried I then painted it again to cover the white plaster. This seems to have given a nice surface, although I don't think the same would work in 4mm scale as the texture would still be fairly smooth.
I've never tried painting red brick before and the second shed caused quite a few problems. I tried a number of different approaches before I settled on something that mostly worked. In the end I painted the walls with RailMatch dark brick, and then used thinned down RailMatch weathered stone run into the mortar gaps. A final patchy black wash made things look nice and dirty. The corrugated roof was initially painted with roof dirt before a dry brushing of Model Color London grey. This gave a nice approximation of new corrugated tin which was then aged using repeated applications of MIG Productions standard rust effects.
While I did enjoy building and painting these sheds, the slight detour back to N gauge modelling has confirmed that I'm much happier working at 4mm to the foot scale so I don't think I'll be returning to N gauge at any future point.
I painted the walls and door of the wooden shed using my standard approach for aged wood which has worked well on the OO9 wagons I've recently been building. This seems to work well for N gauge buildings as well. When it came to the roof, however, I wasn't happy with the very flat look of painted brass. To add a little texture I painted it with RailMatch roof dirt and then blew on a small amount of polyfilla while the paint was still wet. Once the paint had dried I then painted it again to cover the white plaster. This seems to have given a nice surface, although I don't think the same would work in 4mm scale as the texture would still be fairly smooth.
I've never tried painting red brick before and the second shed caused quite a few problems. I tried a number of different approaches before I settled on something that mostly worked. In the end I painted the walls with RailMatch dark brick, and then used thinned down RailMatch weathered stone run into the mortar gaps. A final patchy black wash made things look nice and dirty. The corrugated roof was initially painted with roof dirt before a dry brushing of Model Color London grey. This gave a nice approximation of new corrugated tin which was then aged using repeated applications of MIG Productions standard rust effects.
While I did enjoy building and painting these sheds, the slight detour back to N gauge modelling has confirmed that I'm much happier working at 4mm to the foot scale so I don't think I'll be returning to N gauge at any future point.
Wednesday, November 19, 2014
Track Painting
While I was more than happy with my first attempt at track building clearly it needed painting as sleepers are never copper coloured and the rail is never that shiny.
The first job though was to fill the gaps I'd had to file in the sleepers and I did this using some perfect plastic putty from Deluxe Materials which was filed smooth once it had set. The rails were then given a good clean before I tried something new; metal black.
When I built Jerusalem I painted the rails but it wasn't exactly a success. I found that the paint wouldn't stick well to the rails and tended to flake off over time. This time I decided to try using a chemical to blacken the rails instead, specifically I'm using Carr's metal black for nickel silver which I picked up from C&L Finescale along with the track. The health warnings on the bottle were almost enough to put me off using it, but I gently applied it to the rail using cotton wool buds. I was amazed just how quickly it works, but you do have to make sure the rail is very clean as I found any bits that weren’t were impervious to the chemical and stayed shiny. Once I was happy with the colouring I then applied some Carr's Electrofix to seal everything. Electrofix has a misleading name in that it doesn't actually conduct electricity, so I then buffed the railtops using a coffee stirrer which removed the electrofix and some of the blackening to give a used look to the rails. The final step was to paint the sleepers which I did using RailMatch sleeper grime.
Amazingly after all that the rails still conduct power nicely and the locomotive still moves, and I think the whole thing looks much more convincing than the ready-to-run track I was using before.
The first job though was to fill the gaps I'd had to file in the sleepers and I did this using some perfect plastic putty from Deluxe Materials which was filed smooth once it had set. The rails were then given a good clean before I tried something new; metal black.
When I built Jerusalem I painted the rails but it wasn't exactly a success. I found that the paint wouldn't stick well to the rails and tended to flake off over time. This time I decided to try using a chemical to blacken the rails instead, specifically I'm using Carr's metal black for nickel silver which I picked up from C&L Finescale along with the track. The health warnings on the bottle were almost enough to put me off using it, but I gently applied it to the rail using cotton wool buds. I was amazed just how quickly it works, but you do have to make sure the rail is very clean as I found any bits that weren’t were impervious to the chemical and stayed shiny. Once I was happy with the colouring I then applied some Carr's Electrofix to seal everything. Electrofix has a misleading name in that it doesn't actually conduct electricity, so I then buffed the railtops using a coffee stirrer which removed the electrofix and some of the blackening to give a used look to the rails. The final step was to paint the sleepers which I did using RailMatch sleeper grime.
Amazingly after all that the rails still conduct power nicely and the locomotive still moves, and I think the whole thing looks much more convincing than the ready-to-run track I was using before.
Sunday, November 9, 2014
Dry Stone Walling
Some of you may remember that back in March I built a couple of short sections of stone walling using brick papers from scalescenes.com. The first attempt was wrong as the stones were too big, and while the second attempt was better, the wall was just too flat with no relief. Having now abandoned brick papers for full structures in favour of embossed plastikard I decided I needed to have another go at building a stone wall. The result is this little test piece (using the driver from the Brian Madge Quarry Hunslet kit to give a sense of scale).
Personally I think this looks an order of magnitude better than my previous attempts. It did, however, taken an order of magnitude longer to produce as well. In fact that short piece of wall took all day, although some of that was waiting for DAS clay to dry. What you are looking at is a wall where each stone was cut and laid separately to produce a dry stone wall; albeit with PVA to keep the stones in place.
The technique I've used is based on Ian Nuttall's description of how he built dry stone walls for his layout (February 2013 edition of Railway Modeller). The idea is to create 6mm wide strips of DAS clay of varying heights that can be cut to make individual stones and used to model a 1' 6" wide wall. Rolling, measuring and and cutting DAS clay to the right sizes would be a pain, which is where the plastic tagliatelle comes in to play.
I built a jig from a sheet of 2mm plastikard and various sized square sections of plastruct. I used 1.5mm, 2mm, 2.5mm, 3.2mm, and 4mm sections to give five channels 6mm wide allowing me to model stones 4 1/2", 6", 7 1/2", 9 2/3" and 1' tall by simply pushing DAS into the channels of the jig. The problem is removing the DAS from the jig. The trick here is to place one of the plastic strips at the bottom of the channel, then add the DAS, and then just lift the plastic strip to remove the clay. Once the DAS has dried the plastic strip peels off easily and can be reused.
Once the clay strips have dried (I should possibly have left them a little longer but I was getting inpatient) they can be cut into individual stones; I found my track cutters worked really well for this bit. The wall is started by laying down a thin ribbon of PVA and placing the first course of stones. Small dabs of PVA are then used to add the further layers trying to avoid any leaking out the side of a join. I aimed for a level topped four foot high wall, before then adding the capping stones, which were slightly rounded, to give a wall approximately 4' 6" high. This seems to look about right next to the figure.
I painted the wall initially with RailMatch weathered stone (#2426) before giving the whole thing a black wash making sure to get the wash deep into the cracks where the base coat hadn't necessarily flowed. I then lightly dry brushed more weathered stone and some khaki (Model Color #988) to add a little variation. The final touch (which is mostly hidden behind the greenery) was to dry brush a little brown sand (Model Color #876) along the bottom of the wall to represent dirt having splashed up.
While the wall looked good at that point (I forgot to take any photos) I thought it was worth adding more scenery to see how it would look in the context of a layout rather than in isolation. I used some cheap burnt umber acrylic (I bought a large tube ages ago from WH Smiths) to provide a base colour and to hide the white cardboard. I then used Woodland Scenics green blend blended turf to provide ground cover before adding various shades of Woodland Scenics bushes and foliage clumps for bushes around the wall edges. The final touch was a little bit of yellow flowering foliage to the right side to add more colour.
Hopefully you will all agree that this looks a lot better than my previous brick paper attempts at making walls. Having said that it still isn't perfect, mostly as I think the proportion of large stones in the wall is too high; locally the walls are mostly small stones rather than large chunks. Changing the proportion of stone sizes though is easy so I think this is another scenic technique that I'm now happy with so another piece of the puzzle falls into place.
Personally I think this looks an order of magnitude better than my previous attempts. It did, however, taken an order of magnitude longer to produce as well. In fact that short piece of wall took all day, although some of that was waiting for DAS clay to dry. What you are looking at is a wall where each stone was cut and laid separately to produce a dry stone wall; albeit with PVA to keep the stones in place.
The technique I've used is based on Ian Nuttall's description of how he built dry stone walls for his layout (February 2013 edition of Railway Modeller). The idea is to create 6mm wide strips of DAS clay of varying heights that can be cut to make individual stones and used to model a 1' 6" wide wall. Rolling, measuring and and cutting DAS clay to the right sizes would be a pain, which is where the plastic tagliatelle comes in to play.
I built a jig from a sheet of 2mm plastikard and various sized square sections of plastruct. I used 1.5mm, 2mm, 2.5mm, 3.2mm, and 4mm sections to give five channels 6mm wide allowing me to model stones 4 1/2", 6", 7 1/2", 9 2/3" and 1' tall by simply pushing DAS into the channels of the jig. The problem is removing the DAS from the jig. The trick here is to place one of the plastic strips at the bottom of the channel, then add the DAS, and then just lift the plastic strip to remove the clay. Once the DAS has dried the plastic strip peels off easily and can be reused.
Once the clay strips have dried (I should possibly have left them a little longer but I was getting inpatient) they can be cut into individual stones; I found my track cutters worked really well for this bit. The wall is started by laying down a thin ribbon of PVA and placing the first course of stones. Small dabs of PVA are then used to add the further layers trying to avoid any leaking out the side of a join. I aimed for a level topped four foot high wall, before then adding the capping stones, which were slightly rounded, to give a wall approximately 4' 6" high. This seems to look about right next to the figure.
I painted the wall initially with RailMatch weathered stone (#2426) before giving the whole thing a black wash making sure to get the wash deep into the cracks where the base coat hadn't necessarily flowed. I then lightly dry brushed more weathered stone and some khaki (Model Color #988) to add a little variation. The final touch (which is mostly hidden behind the greenery) was to dry brush a little brown sand (Model Color #876) along the bottom of the wall to represent dirt having splashed up.
While the wall looked good at that point (I forgot to take any photos) I thought it was worth adding more scenery to see how it would look in the context of a layout rather than in isolation. I used some cheap burnt umber acrylic (I bought a large tube ages ago from WH Smiths) to provide a base colour and to hide the white cardboard. I then used Woodland Scenics green blend blended turf to provide ground cover before adding various shades of Woodland Scenics bushes and foliage clumps for bushes around the wall edges. The final touch was a little bit of yellow flowering foliage to the right side to add more colour.
Hopefully you will all agree that this looks a lot better than my previous brick paper attempts at making walls. Having said that it still isn't perfect, mostly as I think the proportion of large stones in the wall is too high; locally the walls are mostly small stones rather than large chunks. Changing the proportion of stone sizes though is easy so I think this is another scenic technique that I'm now happy with so another piece of the puzzle falls into place.
Sunday, October 12, 2014
It's All Iain's Fault!
Yes this post is definitely all Iain's fault, but I don't mean that in a bad way.
As you all know I've recently been 3D printing lots of small narrow gauge wagons. In fact I'm now up to five different wagons: an 8ft freelance flat wagon, 3 bar slab wagon, an Aberllefenni Box Wagon, a 4 bar slab wagon, and most recently a Rhosydd rubbish wagon. These models have all been fun to design, print and assemble and Iain has kindly provided lots of useful prototype information for a number of them. I also have a couple of other wagons under development that are proving a little tricky to get right (mostly due to weird issues with the 3D printing process) but I thought I was slowly running out of scale drawings that would cause a distraction from building Canopus (I still haven't bitten the bullet and permanently attached the coupling rods). It was at this point Iain pointed me in the direction of Narrow Gauge and Industrial Railway Modelling Review (which I mentioned in the previous post). More importantly he pointed out that there were some very interesting scale drawings in the free sample magazine available from the website. A quick glance and not only had I subscribed to the magazine but I'd started work on yet another wagon model. So you see this model is definitely Iain's fault; thanks Iain!
Pages 33 to 41 of the magazine cover a multitude of wagons that were all used at Trevor Quarry on the Lleyn Peninsula in North Wales. Interestingly this was a granite quarry rather than the more common slate quarries found in North Wales. The specific wagon that caught me eye in the magazine was the rather odd, 3 sided, breaker wagon; the magazine has a photo and scale drawings on pages 35 to 37. While a 3 sided wagon might not have wide spread use it intrigued me enough that I set about designing a 3D print. I'll start by showing you the finished model and then explain how I got there.
The photo is of course a little misleading as this model is actually just 3.2cm long by 1.85cm wide and 1.35cm tall; in other words not very big at all. The relatively small size of the model also causes a few issues when designing it as some parts were too thin to be printed and some parts I decided might cause a problem when printed. This means that the model is actually a mix of 3D printed resin, brass sheet, and some standard copier paper.
The two problem areas that I identified when designing the model were the metal supports at the open side of the wagon, and the protective strip along the top edge of the side wall. These were problematic for different reasons and due to their shape required different solutions.
The two upright supports were a problem as I can't print parts that thin. The minimum wall thickness is 0.3mm but if I'd printed the parts I would have had to widen the wagon to make them fit and to keep the correct proportions. And of course the parts would have been very fragile and liable to break if knocked about. Fortunately the part isn't a particularly complex shape and so it was easy to cut and fold two small pieces of 0.12mm brass sheet to the required shape which could then be glued to the resin print.
The protective strip along the top of the side wall was a problem for a different reason. While I could have easily included this in the model, I've found that overhanging horizontal features, no matter how small, tend to cause other details to be obscured. This is due to the support material reacting with the printed resin. In this case it could easily have led to the side planks ending up with strange markings and would probably have completely obscured the gaps between the planks. My original intention had been to use brass sheet to add this part as well. Unfortunately, even with the hold-and-fold, I found it impossible to make the U shaped part. In the end I just made the part from 100gms copier paper which was then glued in place.
The final touch, before painting, was to add some rivet detail to the new parts which are simply Archer rivet transfers from sheet AR88025.
Painting was my now standard approach for aged wagons. The whole wagon is given a matt black undercoat. The wooden parts are then roughly painted with khaki (Model Color #988) and then a black wash. Drybrushing of khaki, brown sand (Model Color #876) and dark sand (Model Color #847) then follows, before another thin black wash and final drybrushing with dark sand. The metal parts were then painted black (to cover over paint from the wooden parts) and then dry brushed with London grey (Model Color #836) and dark rust (RailMatch #2405). A few wafts of matt varnish then tone down and seal the paints.
As with the other wagons I've printed recently I'll happily sell you one via Penistone Railway Works. I'm not sure there will be much interest given the rather odd nature of the wagon, but it's available if you want one, along with full instructions for adding the extra details.
Having built the breaker wagon I'm tempted to have a go at the mill wagon on page 38 of the sample issue as it appears to be pretty much the same wagon with some additional parts. Watch this apace!
As you all know I've recently been 3D printing lots of small narrow gauge wagons. In fact I'm now up to five different wagons: an 8ft freelance flat wagon, 3 bar slab wagon, an Aberllefenni Box Wagon, a 4 bar slab wagon, and most recently a Rhosydd rubbish wagon. These models have all been fun to design, print and assemble and Iain has kindly provided lots of useful prototype information for a number of them. I also have a couple of other wagons under development that are proving a little tricky to get right (mostly due to weird issues with the 3D printing process) but I thought I was slowly running out of scale drawings that would cause a distraction from building Canopus (I still haven't bitten the bullet and permanently attached the coupling rods). It was at this point Iain pointed me in the direction of Narrow Gauge and Industrial Railway Modelling Review (which I mentioned in the previous post). More importantly he pointed out that there were some very interesting scale drawings in the free sample magazine available from the website. A quick glance and not only had I subscribed to the magazine but I'd started work on yet another wagon model. So you see this model is definitely Iain's fault; thanks Iain!
Pages 33 to 41 of the magazine cover a multitude of wagons that were all used at Trevor Quarry on the Lleyn Peninsula in North Wales. Interestingly this was a granite quarry rather than the more common slate quarries found in North Wales. The specific wagon that caught me eye in the magazine was the rather odd, 3 sided, breaker wagon; the magazine has a photo and scale drawings on pages 35 to 37. While a 3 sided wagon might not have wide spread use it intrigued me enough that I set about designing a 3D print. I'll start by showing you the finished model and then explain how I got there.
The photo is of course a little misleading as this model is actually just 3.2cm long by 1.85cm wide and 1.35cm tall; in other words not very big at all. The relatively small size of the model also causes a few issues when designing it as some parts were too thin to be printed and some parts I decided might cause a problem when printed. This means that the model is actually a mix of 3D printed resin, brass sheet, and some standard copier paper.
The two problem areas that I identified when designing the model were the metal supports at the open side of the wagon, and the protective strip along the top edge of the side wall. These were problematic for different reasons and due to their shape required different solutions.
The two upright supports were a problem as I can't print parts that thin. The minimum wall thickness is 0.3mm but if I'd printed the parts I would have had to widen the wagon to make them fit and to keep the correct proportions. And of course the parts would have been very fragile and liable to break if knocked about. Fortunately the part isn't a particularly complex shape and so it was easy to cut and fold two small pieces of 0.12mm brass sheet to the required shape which could then be glued to the resin print.
The protective strip along the top of the side wall was a problem for a different reason. While I could have easily included this in the model, I've found that overhanging horizontal features, no matter how small, tend to cause other details to be obscured. This is due to the support material reacting with the printed resin. In this case it could easily have led to the side planks ending up with strange markings and would probably have completely obscured the gaps between the planks. My original intention had been to use brass sheet to add this part as well. Unfortunately, even with the hold-and-fold, I found it impossible to make the U shaped part. In the end I just made the part from 100gms copier paper which was then glued in place.
The final touch, before painting, was to add some rivet detail to the new parts which are simply Archer rivet transfers from sheet AR88025.
Painting was my now standard approach for aged wagons. The whole wagon is given a matt black undercoat. The wooden parts are then roughly painted with khaki (Model Color #988) and then a black wash. Drybrushing of khaki, brown sand (Model Color #876) and dark sand (Model Color #847) then follows, before another thin black wash and final drybrushing with dark sand. The metal parts were then painted black (to cover over paint from the wooden parts) and then dry brushed with London grey (Model Color #836) and dark rust (RailMatch #2405). A few wafts of matt varnish then tone down and seal the paints.
As with the other wagons I've printed recently I'll happily sell you one via Penistone Railway Works. I'm not sure there will be much interest given the rather odd nature of the wagon, but it's available if you want one, along with full instructions for adding the extra details.
Having built the breaker wagon I'm tempted to have a go at the mill wagon on page 38 of the sample issue as it appears to be pretty much the same wagon with some additional parts. Watch this apace!
Tuesday, September 23, 2014
Up To Scratch?
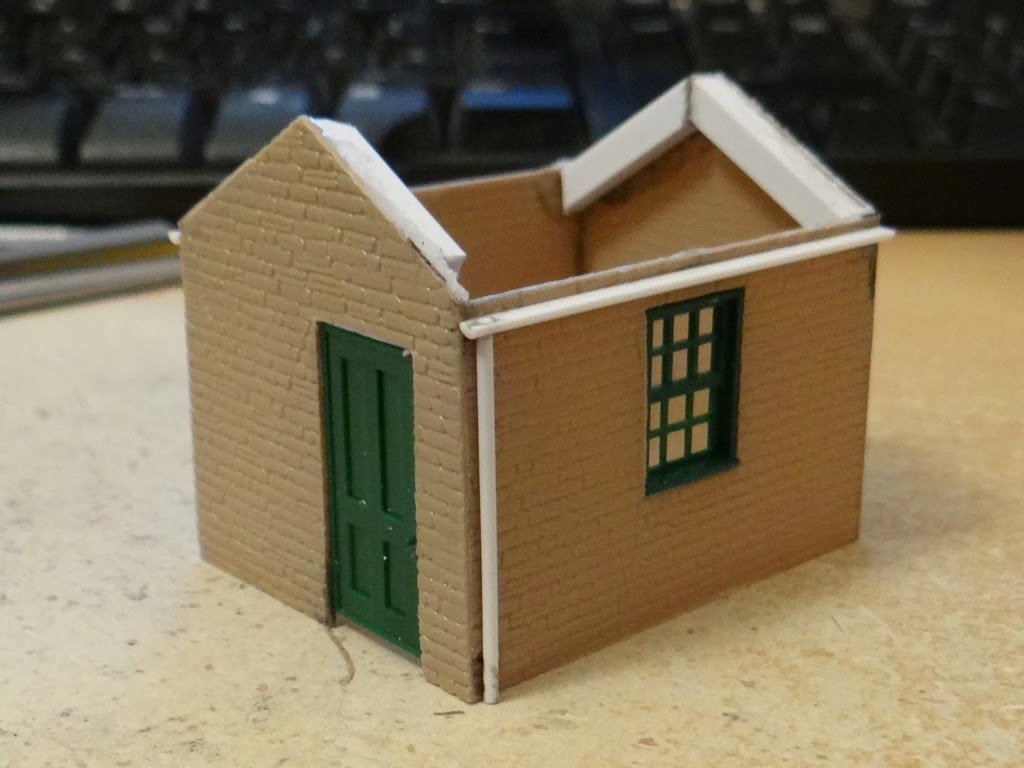
Having finished the basic structure of my first scratchbuilt building in the previous post, I got on with doing the roof and painting it. For some reason it didn't seem worth doing separate posts for each stage so I'll just take you through the whole process in a single post. Anyway, lets start at the end with a shot of the completed building (remember the gap under the door is so I can sink the building).
Hopefully you'll all agree that this looks a lot better than it did in the previous post! So how did I turn the rather tatty looking shell of a building into something that while not perfect I'm still fairly proud of? Well it all started with a triangular needle file.
One of my main concerns, which I didn't mention at the time, was that at the corners the brick courses didn't match up very well, especially where you could see the edge of the plastikard sheet. I'd tried to fix this using a scalpel to cut the courses into place without much success. Fortunately Martin picked up on the corners in a comment and pointed me in the direction of a triangular file. Quite why I'd not thought of this myself I don't know, but just two minutes with a file and the building looked a lot better.
Once I'd sorted the corner joints the next job was the roof. I started by fixing a piece of cardboard in place to form the base of the roof before I moved onto figuring out how to add the tiles. My approach to covering the roof in slates was to follow the ideas described by David Wright in his book Making Rural Buildings for Model Railways. Unfortunately I made a couple of mistakes which would come back to bite me later. Essentially the approach involves drawing out slates in strips onto card and then cutting part way into each strip. This means you can lay an entire row of slates in one go as the join between them is hidden by the next row placed on top. I decided to use Princess Slates which are apparently 24 inches by 14 inches in size. Now I don't know how much overlap there usually is between two rows of slates but the book suggests a third. Unfortunately I misread this as a half so the rows are closer together than they should be. I also made the mistake of using normal copier paper for the slates. The problem with this became obvious as soon as I sprayed on some primer. Essentially because I'd applied the tiles as strips and the thinness of the paper the gaps between adjacent slates kind of disappeared. I carried on with painting but we will return to the slates later.
Basic painting followed a fairly simple pattern; a base colour followed by some dry brushing and a black wash. The roof used dark sea grey (Model Color #991) followed by a black wash and then dry brushing first with a little Dark Blue Grey (Model Color #904) and then black. The walls were painted first with Weathered Stone (RailMatch #2426) before a black wash and then dry brushing with khaki, brown sand, dark sand (Model Color #988, #876, and #847), and black. At this point you can see the problem with the roof tiles quite clearly, but I carried on regardless.
With the basic painting done I turned to the details, specifically the door and window frame. I was originally going to go for a dirty white for the window but Bryony suggested a worn and faded blue paint used everywhere might look better. The base coat was a 4 to 1 mixture of Flat Blue and Dark Blue Grey (Model Color #962 and #904) with then a light dry brushing of more Dark Blue Grey before a black wash to really make things look dirty. I think this has worked really well, although in retrospect the window sill maybe should have been modelled as stone rather than painted wood. Having essentially finished the building at this point I came to the conclusion that I really wasn't happy with the roof.
Unfortunately because I'd built the model as a single piece it wasn't possible to remove the existing roof, certainly not without damaging the painting I'd already done. So instead I simply laid another layer of slates over the top. This time I made them from 220gms card and ehile they are much better they still aren't perfect. Next time I might do separate slates instead of fitting a row in a single go.
The problem with the extra layer of slates was that the roof was now quite proud of the side walls. To hide this I decided to add barge boards which I cobbled together from some 0.5mm plastruct strip. I used a file to roughen the surface slightly to try and imitate wood grain although I'm not sure how successful that was. They were then painted in the same way as the door and window frame before being super-glued into place. Annoyingly after fitting them I realised they were possibly a bit short; the cowboy builders have struck again! At this point I also added a sill above the door from a short piece of right-angle plastruct which I think adds a nice little touch to the door and helps to hide the edge of the plastikard sheet.
Now usually I leave glazing windows until the very end as I want the "glass" to be nice and shiny. In this case I wanted the windows to end up looking as if they hadn't been cleaned in years, so I used Micro Kristal Klear to add the individual panes before I wafted over a light layer of matt varnish to seal everything in place. Looking at the final model I decided that the guttering was too pristine so toned this down by dry brushing a little London Grey (Model Color #836) over the metalwork and then a second coat of matt varnish made sure the windows were nice and frosted and the paint well sealed.
As I said at the start of this post the building is far from perfect but I'm really happy with how it has turned out and the amount of things I've learnt along the way. The next building is bound to be much better given my experiences here. This building was never destined for my layout so I think I'll build it a little diorama as an excuse for more scenic experimentation rather than simply throwing it away.
Hopefully you'll all agree that this looks a lot better than it did in the previous post! So how did I turn the rather tatty looking shell of a building into something that while not perfect I'm still fairly proud of? Well it all started with a triangular needle file.
One of my main concerns, which I didn't mention at the time, was that at the corners the brick courses didn't match up very well, especially where you could see the edge of the plastikard sheet. I'd tried to fix this using a scalpel to cut the courses into place without much success. Fortunately Martin picked up on the corners in a comment and pointed me in the direction of a triangular file. Quite why I'd not thought of this myself I don't know, but just two minutes with a file and the building looked a lot better.
Once I'd sorted the corner joints the next job was the roof. I started by fixing a piece of cardboard in place to form the base of the roof before I moved onto figuring out how to add the tiles. My approach to covering the roof in slates was to follow the ideas described by David Wright in his book Making Rural Buildings for Model Railways. Unfortunately I made a couple of mistakes which would come back to bite me later. Essentially the approach involves drawing out slates in strips onto card and then cutting part way into each strip. This means you can lay an entire row of slates in one go as the join between them is hidden by the next row placed on top. I decided to use Princess Slates which are apparently 24 inches by 14 inches in size. Now I don't know how much overlap there usually is between two rows of slates but the book suggests a third. Unfortunately I misread this as a half so the rows are closer together than they should be. I also made the mistake of using normal copier paper for the slates. The problem with this became obvious as soon as I sprayed on some primer. Essentially because I'd applied the tiles as strips and the thinness of the paper the gaps between adjacent slates kind of disappeared. I carried on with painting but we will return to the slates later.
Basic painting followed a fairly simple pattern; a base colour followed by some dry brushing and a black wash. The roof used dark sea grey (Model Color #991) followed by a black wash and then dry brushing first with a little Dark Blue Grey (Model Color #904) and then black. The walls were painted first with Weathered Stone (RailMatch #2426) before a black wash and then dry brushing with khaki, brown sand, dark sand (Model Color #988, #876, and #847), and black. At this point you can see the problem with the roof tiles quite clearly, but I carried on regardless.
With the basic painting done I turned to the details, specifically the door and window frame. I was originally going to go for a dirty white for the window but Bryony suggested a worn and faded blue paint used everywhere might look better. The base coat was a 4 to 1 mixture of Flat Blue and Dark Blue Grey (Model Color #962 and #904) with then a light dry brushing of more Dark Blue Grey before a black wash to really make things look dirty. I think this has worked really well, although in retrospect the window sill maybe should have been modelled as stone rather than painted wood. Having essentially finished the building at this point I came to the conclusion that I really wasn't happy with the roof.
Unfortunately because I'd built the model as a single piece it wasn't possible to remove the existing roof, certainly not without damaging the painting I'd already done. So instead I simply laid another layer of slates over the top. This time I made them from 220gms card and ehile they are much better they still aren't perfect. Next time I might do separate slates instead of fitting a row in a single go.
The problem with the extra layer of slates was that the roof was now quite proud of the side walls. To hide this I decided to add barge boards which I cobbled together from some 0.5mm plastruct strip. I used a file to roughen the surface slightly to try and imitate wood grain although I'm not sure how successful that was. They were then painted in the same way as the door and window frame before being super-glued into place. Annoyingly after fitting them I realised they were possibly a bit short; the cowboy builders have struck again! At this point I also added a sill above the door from a short piece of right-angle plastruct which I think adds a nice little touch to the door and helps to hide the edge of the plastikard sheet.
Now usually I leave glazing windows until the very end as I want the "glass" to be nice and shiny. In this case I wanted the windows to end up looking as if they hadn't been cleaned in years, so I used Micro Kristal Klear to add the individual panes before I wafted over a light layer of matt varnish to seal everything in place. Looking at the final model I decided that the guttering was too pristine so toned this down by dry brushing a little London Grey (Model Color #836) over the metalwork and then a second coat of matt varnish made sure the windows were nice and frosted and the paint well sealed.
As I said at the start of this post the building is far from perfect but I'm really happy with how it has turned out and the amount of things I've learnt along the way. The next building is bound to be much better given my experiences here. This building was never destined for my layout so I think I'll build it a little diorama as an excuse for more scenic experimentation rather than simply throwing it away.
Tuesday, July 8, 2014
Cobbles or Setts?
If you can remember back to February then you'll unfortunately be able to recall my first rather poor attempt at modelling cobble stones. In the comments to that post GB also pointed out that a cobbled street is usually paved with irregular stones, whereas setts (which are what I've always called cobble stones) are made from regular, usually rectangular, worked stone. While my approach to modelling cobble stones improved until I was happy enough to produce a small photographic diorama the fact remains that I've been producing regular circular stones which are neither cobbles or setts.
Part of the problem has been that producing regular circular stones using the ink tube from a biro is easy, but I couldn't think of a similar way of producing rectangular stones. Yesterday I realised that I should be able to build a simple stamp from some of the styrene strip I have kicking around. Essentially I built a rectangular tube from some 0.5mm thick styrene (Plastruct #90729) held together with plastic weld from E.M.A. Model Supplies. Once the weld had set I filled down the joins and the styrene to thin it a bit below 0.5mm leaving me with a stamp I could use to make rectangular stones of approximately 3mm by 1mm which represent 9 inch by 3 inch given that I'm working at a scale of 4mm to the foot.
Armed with my stamp I produced another small test piece using DAS clay as before, which was then painted in the same fashion as my previous attempts.
I think these setts look really good, although those between the rails (which is where I started) could be better; not sure if I should put them in the other orientation to those outside the rails, or just not offset each row as two bricks (i.e. 6mm plus the gaps) are a good fit between the rails? So now I have a decision to make, cobbles or setts? I think the setts are more realistic as the cobbles are too uniform, but let me know which you prefer in the comments.
Part of the problem has been that producing regular circular stones using the ink tube from a biro is easy, but I couldn't think of a similar way of producing rectangular stones. Yesterday I realised that I should be able to build a simple stamp from some of the styrene strip I have kicking around. Essentially I built a rectangular tube from some 0.5mm thick styrene (Plastruct #90729) held together with plastic weld from E.M.A. Model Supplies. Once the weld had set I filled down the joins and the styrene to thin it a bit below 0.5mm leaving me with a stamp I could use to make rectangular stones of approximately 3mm by 1mm which represent 9 inch by 3 inch given that I'm working at a scale of 4mm to the foot.
Armed with my stamp I produced another small test piece using DAS clay as before, which was then painted in the same fashion as my previous attempts.
I think these setts look really good, although those between the rails (which is where I started) could be better; not sure if I should put them in the other orientation to those outside the rails, or just not offset each row as two bricks (i.e. 6mm plus the gaps) are a good fit between the rails? So now I have a decision to make, cobbles or setts? I think the setts are more realistic as the cobbles are too uniform, but let me know which you prefer in the comments.
Saturday, July 5, 2014
Yorkshire Stone
While I now have a track plan for 77 Box Lane I still haven't done any track laying or building construction, mostly as I keep getting distracted by the Welsh slate industry! I did get as far as doing some cobble experiments and I even used some scalescenes.com brick papers to build a small photographic diorama. While the wall looked pretty good on the diorama I came to the decision, when trying to use the same paper for a low wall, that the stones were a bit large and that the lack of relief might be a problem on such a narrow layout, but at the time I didn't have any better ideas, short of using DAS clay and scribing the stones by hand.
About a month or so ago, when browsing in my local model shop, I picked up a piece of Slater's embossed plastikard that looked like it might be a good alternative to the brick paper I'd been using, although at the time I wasn't sure how I was going to be able to paint it to look like Yorkshire stone so it got put to one side.
Fortunately two things then happened which have led me to an approach to painting the embossed sheet to look like Yorkshire stone that I'm fairly happy with. First up Iain went and wrote a blog post about the slate wagons I sent him. This in turn delayed Geoff from writing a blog post about his excellent Llangunllo layout. When he did write the delayed post he happened to mention that he'd used RailMatch concrete to colour the mortar course on the building he was painting. The second thing was that yesterday I painted a weathered example of my narrow gauge flat wagon and I decided that the colour wasn't that far away from dirty, smoke blackened Yorkshire stone.
Combining these two ideas led me to paint the embossed sheet as follows. Firstly I sprayed the sheet with a white primer as I found that the acrylics wouldn't stick to it very well. Once that had dried I painted the entire thing using the RailMatch concrete (#2422) to act as a base coat as well as to colour the mortar. I then dry brushed on khaki (Model Color 70.988) followed by brown sand (Model Color 70.876). This was then all toned down slightly with a thin black wash, before the final details were added by dry brushing with dark sand (Model Color 70.847) and black (Model Color 70.950) to simulate the dirty patches.
It was only when I'd finished painting this small sample that I noticed that, according to the sticker on the back, the sheet is for 7mm scale modelling not 4mm scale, oops. Given that I bought the sheet as the stones looked a similar size to those on the scalescenes.com brick paper this would explain why those stones looked too big. The stones on this sheet are actually slightly smaller than on the scalescenes.com sheet being about 3mm, so 9 inches, tall. The sheet might work for a large factory, but I'll try and pick up a 4mm sheet of the same stone effect and see if that looks a bit better sized for walls and small workshops, but at least this is progress... of a sort.
About a month or so ago, when browsing in my local model shop, I picked up a piece of Slater's embossed plastikard that looked like it might be a good alternative to the brick paper I'd been using, although at the time I wasn't sure how I was going to be able to paint it to look like Yorkshire stone so it got put to one side.
Fortunately two things then happened which have led me to an approach to painting the embossed sheet to look like Yorkshire stone that I'm fairly happy with. First up Iain went and wrote a blog post about the slate wagons I sent him. This in turn delayed Geoff from writing a blog post about his excellent Llangunllo layout. When he did write the delayed post he happened to mention that he'd used RailMatch concrete to colour the mortar course on the building he was painting. The second thing was that yesterday I painted a weathered example of my narrow gauge flat wagon and I decided that the colour wasn't that far away from dirty, smoke blackened Yorkshire stone.
Combining these two ideas led me to paint the embossed sheet as follows. Firstly I sprayed the sheet with a white primer as I found that the acrylics wouldn't stick to it very well. Once that had dried I painted the entire thing using the RailMatch concrete (#2422) to act as a base coat as well as to colour the mortar. I then dry brushed on khaki (Model Color 70.988) followed by brown sand (Model Color 70.876). This was then all toned down slightly with a thin black wash, before the final details were added by dry brushing with dark sand (Model Color 70.847) and black (Model Color 70.950) to simulate the dirty patches.
It was only when I'd finished painting this small sample that I noticed that, according to the sticker on the back, the sheet is for 7mm scale modelling not 4mm scale, oops. Given that I bought the sheet as the stones looked a similar size to those on the scalescenes.com brick paper this would explain why those stones looked too big. The stones on this sheet are actually slightly smaller than on the scalescenes.com sheet being about 3mm, so 9 inches, tall. The sheet might work for a large factory, but I'll try and pick up a 4mm sheet of the same stone effect and see if that looks a bit better sized for walls and small workshops, but at least this is progress... of a sort.
Friday, July 4, 2014
A Well Used Wagon
You may remember that my first attempt at designing and 3D printing an OO9 gauge wagon back in May was for a freelance 8ft flat wagon which I painted as if it was fresh from the workshop. While the wagon runs well a number of you suggested that in reality they wouldn't look new for very long. My solution to this was to print multiple wagons so I could have sets representing them at different ages and amounts of abuse. I even got as far as experimenting with how I would paint older looking wood but I never got around to actually painting another set of models.
Well I still haven't painted a set, but I have painted one which you can see here alongside one of the original freshly built versions. My approach followed the second of the two approaches I experimented with for the wooden sections. The metalwork was painted black then dry brushed with a little Model Color London Grey (#70.836) and Rail Match Dark Rust. The final touch was a little bit of Flory Models rust weathering wash before a waft of matt varnish was applied to seal everything in place. I'll add the couplings at some point but even without them I'm really happy with how this all turned out. It definitely looks older and more well used without looking badly abused.
If you fancy painting one of these yourself then head on over to Penistone Railway Works and I'll happily sell you some.
Well I still haven't painted a set, but I have painted one which you can see here alongside one of the original freshly built versions. My approach followed the second of the two approaches I experimented with for the wooden sections. The metalwork was painted black then dry brushed with a little Model Color London Grey (#70.836) and Rail Match Dark Rust. The final touch was a little bit of Flory Models rust weathering wash before a waft of matt varnish was applied to seal everything in place. I'll add the couplings at some point but even without them I'm really happy with how this all turned out. It definitely looks older and more well used without looking badly abused.
If you fancy painting one of these yourself then head on over to Penistone Railway Works and I'll happily sell you some.
Saturday, April 26, 2014
Quarry Hunslet: Inside The Cab
Before I had all the problems painting the outside of the locomotive I'd painted the inside of the cab while I could still easily get a paintbrush in there. There are two parts to this, painting the backhead controls and painting the inside of the cab walls.
The first job was to touch in the details on the backhead and for this I used three paints. I gave the main backhead surface a light dry brushing with RailMatch oily steel to help bring out some of the details and I used Humbrol acrylic buffer beam red (number 406 from their Rail Colour range) for the regulator handle. For the brass I used Alclad 2 polished brass lacquer. This isn't something I'd used before but it gave just the effect I was looking for. You are supposed to airbrush the lacquer over a gloss surface to give a high shine finish, but I brush painted it over a satin surface which gives a more aged look. I used this lacquer rather than a paint for two reasons. Firstly I couldn't seem to find a brass paint in any of the ranges my local model shop stocks, but more importantly I'm not really a fan of using metallic paints at this scale, unless they are being sparingly dry brushed. I find that the shiny flecks in the metallic paints (that give them the metallic look) are always fairly large and just look really wrong at the small scale we are working with. This lacquer doesn't suffer from this problem at all and I'm betting it would look fantastic airbrushed onto a larger area.
The second job was to paint the inside of the cab walls. From photos, and from having visited the odd cab over the years, I've noticed that generally the bottom half of the walls are painted black, while the top half is usually a buff or cream colour. I'm guessing the use of the lighter colour is to make the cab feel bigger and less claustrophobic. Given the paints I had to hand I used ivory and black from the Model Color range; painting the ivory on first and then masking to get a straight edge to paint the black against.
Personally I think both parts have worked really well, and now that they are assembled together it really does look good.
The first job was to touch in the details on the backhead and for this I used three paints. I gave the main backhead surface a light dry brushing with RailMatch oily steel to help bring out some of the details and I used Humbrol acrylic buffer beam red (number 406 from their Rail Colour range) for the regulator handle. For the brass I used Alclad 2 polished brass lacquer. This isn't something I'd used before but it gave just the effect I was looking for. You are supposed to airbrush the lacquer over a gloss surface to give a high shine finish, but I brush painted it over a satin surface which gives a more aged look. I used this lacquer rather than a paint for two reasons. Firstly I couldn't seem to find a brass paint in any of the ranges my local model shop stocks, but more importantly I'm not really a fan of using metallic paints at this scale, unless they are being sparingly dry brushed. I find that the shiny flecks in the metallic paints (that give them the metallic look) are always fairly large and just look really wrong at the small scale we are working with. This lacquer doesn't suffer from this problem at all and I'm betting it would look fantastic airbrushed onto a larger area.
The second job was to paint the inside of the cab walls. From photos, and from having visited the odd cab over the years, I've noticed that generally the bottom half of the walls are painted black, while the top half is usually a buff or cream colour. I'm guessing the use of the lighter colour is to make the cab feel bigger and less claustrophobic. Given the paints I had to hand I used ivory and black from the Model Color range; painting the ivory on first and then masking to get a straight edge to paint the black against.
Personally I think both parts have worked really well, and now that they are assembled together it really does look good.
Labels:
Alclad 2,
Brian Madge,
Humbrol,
Model Color,
modelling,
OO9,
RailMatch
Sunday, March 2, 2014
Distressing
So having assembled the Baguley-Drewry locomotive the next step was to paint it. My plan was to give it a well looked after finish, unfortunately that didn't happen.
The first step was to give it a coat of primer (Humbrol prime grey from an aerosol) which went on easily and didn't show up any areas that needed attention before the next layer of paint. According to the prototype information the loco would have originally been painted "hazard" yellow, with black side skirts and buffer blocks, so for want of any better ideas I'd picked up an aerosol can of Humbrol yellow gloss (I tend to prefer matt but gloss was all I could get). I masked off the side skirts and bufers and sprayed the model and left it to dry. This seemed to work well, and I had a wonderful smooth finish, so I then masked off the upper body so I could spray on the black paint (Humbrol again, this time black satin). Again this seemed to all go well, until I went to remove the masking tape.
When I removed the masking tape, not only did I find that in some places the black paint had run under the tape, but removing the tape had caused the yellow paint to bubble and lift. To say I was distressed was an understatement. My lovely smooth paint job was ruined. In fact I was so distressed that I couldn't bring myself to photograph the disaster before me. My initial plan to rescue the situation was to try and sand back the damaged areas and repaint, but I quickly decided that wasn't going to work well. I could have tried to strip the paint, but I didn't want to risk the metal parts coming loose. So in the end I decided to switch and finish the model in a run down and distressed state.
I used a combination of a small file, T-cut and a a blunted cocktail stick to remove the black paint that had leaked onto the upper body, as well as the badly bubbled yellow paint, and some areas that were actually okay but where I thought rust was likely to form. I then painted these areas using RailMatch dark rust. Once this had dried I then gently painted some water on to the rusted areas before sprinkling on some fine table salt. Once the water had dried the salt was well attached to the model. At this point I again masked off the black side skirts and buffers, before respraying the rest of the body yellow. This was then allowed to sit and dry thoroughly.
Once the yellow was dry I used a cocktail stick (the pointy end this time) to remove the salt grains which allowed the rust colour to show through, although in some places this also removed some of the the rust colour as well. Once all the salt was removed I dabbed small amounts of a rust weathering wash from Flory Models, onto the rusted areas, wiping most of it off with my finger in a downwards direction to simulate water having run across the surface -- I also brushed some of this wash across the black areas as well. The next step was then to use some of the Humbrol rust weathering powder (which was the free gift when I subscribed to one of the model railway magazines) to tone down the rest of the yellow paint so it didn't look like some areas where pristine while others were badly rusted. Final details, such as the window frames and door handles etc. were then picked out, and the makers name badge attached (with a drop of varnish rather than glue as it gives more time to position it accurately), before a light layer of satin varnish was applied to seal the paint to the model. Once the varnish was dry, the windows were glazed (in the same way as I glazed the windows of the lorry on Jerusalem), and then finally the windscreen wipers were fitted. It took me about 45 minutes to fit these, mostly as it took me about 30 minutes to find the one I dropped on the floor!
While this wasn't at all the way I had set out to paint the model, I am really happy with how it has turned out.
There are two things missing before it can be considered fully complete; couplings and a driver. The roof is only a push fit so once I find a driver model I can easily add one, and I'm not going to add couplings until I've decided on the track layout. The reason for this is that if I decided that the track plan is such that the loco will never run around a set of wagons, then I'll only need couplings at one end, at which point I wouldn't bother to fit both couplings, especially as I doubt they will improve the look of the model.
So while the process was distressing (in both senses of the word) I now have a model I'm really quite proud of.
The first step was to give it a coat of primer (Humbrol prime grey from an aerosol) which went on easily and didn't show up any areas that needed attention before the next layer of paint. According to the prototype information the loco would have originally been painted "hazard" yellow, with black side skirts and buffer blocks, so for want of any better ideas I'd picked up an aerosol can of Humbrol yellow gloss (I tend to prefer matt but gloss was all I could get). I masked off the side skirts and bufers and sprayed the model and left it to dry. This seemed to work well, and I had a wonderful smooth finish, so I then masked off the upper body so I could spray on the black paint (Humbrol again, this time black satin). Again this seemed to all go well, until I went to remove the masking tape.
When I removed the masking tape, not only did I find that in some places the black paint had run under the tape, but removing the tape had caused the yellow paint to bubble and lift. To say I was distressed was an understatement. My lovely smooth paint job was ruined. In fact I was so distressed that I couldn't bring myself to photograph the disaster before me. My initial plan to rescue the situation was to try and sand back the damaged areas and repaint, but I quickly decided that wasn't going to work well. I could have tried to strip the paint, but I didn't want to risk the metal parts coming loose. So in the end I decided to switch and finish the model in a run down and distressed state.
I used a combination of a small file, T-cut and a a blunted cocktail stick to remove the black paint that had leaked onto the upper body, as well as the badly bubbled yellow paint, and some areas that were actually okay but where I thought rust was likely to form. I then painted these areas using RailMatch dark rust. Once this had dried I then gently painted some water on to the rusted areas before sprinkling on some fine table salt. Once the water had dried the salt was well attached to the model. At this point I again masked off the black side skirts and buffers, before respraying the rest of the body yellow. This was then allowed to sit and dry thoroughly.
Once the yellow was dry I used a cocktail stick (the pointy end this time) to remove the salt grains which allowed the rust colour to show through, although in some places this also removed some of the the rust colour as well. Once all the salt was removed I dabbed small amounts of a rust weathering wash from Flory Models, onto the rusted areas, wiping most of it off with my finger in a downwards direction to simulate water having run across the surface -- I also brushed some of this wash across the black areas as well. The next step was then to use some of the Humbrol rust weathering powder (which was the free gift when I subscribed to one of the model railway magazines) to tone down the rest of the yellow paint so it didn't look like some areas where pristine while others were badly rusted. Final details, such as the window frames and door handles etc. were then picked out, and the makers name badge attached (with a drop of varnish rather than glue as it gives more time to position it accurately), before a light layer of satin varnish was applied to seal the paint to the model. Once the varnish was dry, the windows were glazed (in the same way as I glazed the windows of the lorry on Jerusalem), and then finally the windscreen wipers were fitted. It took me about 45 minutes to fit these, mostly as it took me about 30 minutes to find the one I dropped on the floor!
While this wasn't at all the way I had set out to paint the model, I am really happy with how it has turned out.
There are two things missing before it can be considered fully complete; couplings and a driver. The roof is only a push fit so once I find a driver model I can easily add one, and I'm not going to add couplings until I've decided on the track layout. The reason for this is that if I decided that the track plan is such that the loco will never run around a set of wagons, then I'll only need couplings at one end, at which point I wouldn't bother to fit both couplings, especially as I doubt they will improve the look of the model.
So while the process was distressing (in both senses of the word) I now have a model I'm really quite proud of.
Friday, February 7, 2014
Half-and-Half
So while I'm now pretty happy with the shape and pattern of the cobbles I've been trying to create I wasn't entirely happy with my first attempt at painting them. While the effect looked quite good it was very dark, and I think would have looked very wrong if used on a larger area, so I've had two more goes at getting the colour right.
I initially wondered if using black as the base coat was the main problem, so I masked off half of the area and re-sprayed using a can of Humbrol's grey primer as you can see on the right of the experiment. Obviously the grey would be too light now for the gaps between the cobbles so I ran a black wash over it to darken the gaps. On the way home yesterday I also picked up a few more useful paint colours and so dry brushed the whole thing (both the newly painted right hand side and the original left hand side). This time I started with RailMatch flint grey (which is quite a bit lighter than the Model Color London grey), and then used three Model Color paints, ivory, tan earth and cork brown. Finally I ran a black wash across the cobbles between the rails to simulate a dirtier area (dropped oil etc.).
I think the left hand side (black base coat) now looks much better. The use of the lighter flint grey and cork brown have improved the contrast between the cobbles and the gaps between them and I'm really happy with how it looks. The right hand side, however, definitely isn't right; the gaps between the cobbles just aren't dark enough and there isn't enough contrast.
So I think I can call this experiment a success. It may have taken me two attempts to shape the clay and two to paint the cobbles, but I'd much prefer to do that now with small amounts of track, clay and paint then on the full layout where having to start over would have been very wasteful in terms of time and money.
I initially wondered if using black as the base coat was the main problem, so I masked off half of the area and re-sprayed using a can of Humbrol's grey primer as you can see on the right of the experiment. Obviously the grey would be too light now for the gaps between the cobbles so I ran a black wash over it to darken the gaps. On the way home yesterday I also picked up a few more useful paint colours and so dry brushed the whole thing (both the newly painted right hand side and the original left hand side). This time I started with RailMatch flint grey (which is quite a bit lighter than the Model Color London grey), and then used three Model Color paints, ivory, tan earth and cork brown. Finally I ran a black wash across the cobbles between the rails to simulate a dirtier area (dropped oil etc.).
I think the left hand side (black base coat) now looks much better. The use of the lighter flint grey and cork brown have improved the contrast between the cobbles and the gaps between them and I'm really happy with how it looks. The right hand side, however, definitely isn't right; the gaps between the cobbles just aren't dark enough and there isn't enough contrast.
So I think I can call this experiment a success. It may have taken me two attempts to shape the clay and two to paint the cobbles, but I'd much prefer to do that now with small amounts of track, clay and paint then on the full layout where having to start over would have been very wasteful in terms of time and money.
Labels:
Humbrol,
Model Color,
modelling,
OO9,
RailMatch
Saturday, August 10, 2013
From Roots To Branches
Given that I'm not modelling a windswept Hebridean island (although there is at least one person who does) Jerusalem is going to need some trees. Now I've never been a fan of ready to plant trees. They are either conifers modelled as perfect cones or deciduous trees that look more like a green ball on a stick. Even the kits for building trees don't really inspire me; the trunk looks very plasticy and the resulting tree is still very regular looking. What I wanted was some straggly looking trees that were all different but similar.
I've recently been reading through John de Frayssinet's excellent Sceneic Modelling book in which he suggests using sagebrush to create very natural looking trees. Now firstly I don't have any sagebrush plants and secondly John models in 4mm to the foot, and so his trees would be a little big for Jerusalem. It did, however, get me thinking that maybe there was something in the garden that would work.
As this year we have had a reasonable summer we have done quite a bit of work in the garden. This has included removing a number of shrubs that had gone berserk at the back of the garden. I'm not entirely sure what the shrub is but it spreads by putting out underground runners and these runners, cut into bits, looked fairly tree like to my eyes. As the roots went into the recycling bin I cut off the bits that looked promising and left them to dry out. Once dry they were microwaved for about 30 seconds to make sure they (and anything on them) were very dead.
So, yesterday, armed with some dead roots, I set about making some trees. This is essentially a simple four step process, which you can probably figure out from these handy step by step illustrations.
Firstly you need to find the appropriate bits of root. Each root then has a pin inserted into its base to allow it to be easily added to the layout; I used some 0.6mm wire that I had laying around and drilled a 0.65mm hole in each root. The wire was fixed with a small dab of superglue and left to dry. Once the roots were ready I added them to a temporary base (just a push fit into a hole, no glue). The tops of the trees were then sprayed with a matt varnish (specifically Winsor & Newton Artists' Matt Varnish). This makes them very sticky at which point I rolled the tree in Woodland Scenics Medium Green Course Turf. I then allowed the varnish to dry before repeating the process at least once to add more body to the foliage. When I was happy with the tree I then sprayed it with varnish again and sprinkled over some Woodland Scenics Green Blend Blended Turf to add a little colour variation. If you ignore drying time each tree probably took less than five minutes to make.
Once the trees are fully dry I then touch up any areas of the trunk where the bark has rubbed off with small dabs of RailMatch acrylic Sleeper Grime which seems to match the trunk colour quite well. A small hole (0.65mm again) is then drilled in the layout and the tree carefully positioned. I'll probably glue the trees in eventually but for now they are just a push fit so that I can remove them to work on the grass underneath and around them. So here is another shot of the front right corner of the layout with the trees in place.
I've recently been reading through John de Frayssinet's excellent Sceneic Modelling book in which he suggests using sagebrush to create very natural looking trees. Now firstly I don't have any sagebrush plants and secondly John models in 4mm to the foot, and so his trees would be a little big for Jerusalem. It did, however, get me thinking that maybe there was something in the garden that would work.
As this year we have had a reasonable summer we have done quite a bit of work in the garden. This has included removing a number of shrubs that had gone berserk at the back of the garden. I'm not entirely sure what the shrub is but it spreads by putting out underground runners and these runners, cut into bits, looked fairly tree like to my eyes. As the roots went into the recycling bin I cut off the bits that looked promising and left them to dry out. Once dry they were microwaved for about 30 seconds to make sure they (and anything on them) were very dead.
So, yesterday, armed with some dead roots, I set about making some trees. This is essentially a simple four step process, which you can probably figure out from these handy step by step illustrations.
Firstly you need to find the appropriate bits of root. Each root then has a pin inserted into its base to allow it to be easily added to the layout; I used some 0.6mm wire that I had laying around and drilled a 0.65mm hole in each root. The wire was fixed with a small dab of superglue and left to dry. Once the roots were ready I added them to a temporary base (just a push fit into a hole, no glue). The tops of the trees were then sprayed with a matt varnish (specifically Winsor & Newton Artists' Matt Varnish). This makes them very sticky at which point I rolled the tree in Woodland Scenics Medium Green Course Turf. I then allowed the varnish to dry before repeating the process at least once to add more body to the foliage. When I was happy with the tree I then sprayed it with varnish again and sprinkled over some Woodland Scenics Green Blend Blended Turf to add a little colour variation. If you ignore drying time each tree probably took less than five minutes to make.
Once the trees are fully dry I then touch up any areas of the trunk where the bark has rubbed off with small dabs of RailMatch acrylic Sleeper Grime which seems to match the trunk colour quite well. A small hole (0.65mm again) is then drilled in the layout and the tree carefully positioned. I'll probably glue the trees in eventually but for now they are just a push fit so that I can remove them to work on the grass underneath and around them. So here is another shot of the front right corner of the layout with the trees in place.
Thursday, June 13, 2013
Better Ballast
Following on from the previous ballasting experiments I've now tried out a better mixture of the two Woodland Scenics grey ballast products I tried before. I didn't measure out precisely but I was aiming for a mixture of 90% gray and 10% light gray. Hopefully you'll all agree that this looks much better; it's fairly dark but with some subtle variation.
One thing I still have to work on is painting the rails. While the acrylic RailMatch paint works well on the plastic sleepers it doesn't seem to work so well on the metal rails. It goes on fairly well but when I try and clean the rail top (to ensure electrical connectivity to the locomotives) it peels off the sides in chunks as well. I don't really want to have to prime the rails but I might have to unless I can find a better solution. I've picked up a bottle of RailMatch enamel sleeper grime to see if it behaves better than the acrylic version so there will be more experimentation.
Sunday, June 9, 2013
A Question of Ballast
While progress in the layout might have stalled slightly this week (long days travelling into work to teach on a training course), I did manage to spend a little time yesterday experimenting with track painting and ballasting. I was going to do a post on what colour to paint the rails but after an initial experiment trying four RailMatch paints; sleeper grime, light rust, dark rust, and oily steel. There really was no contest though as only the sleeper grime looked at all convincing. The added bonus is that I was already intending to use it to paint the sleepers so using a single colour for rails and sleepers will make the job much easier. Having fixed on sleeper grime I repainted all the rails (although not very well as you can see the light rust peeking through) and then set about experimening with different ballast colours.
As you can see from the photo I've tried three different approaches (I did this in a bit of a rush hence the ballast isn't very neat):
I used two different colours of Woodland Scenics fine ballast; gray and light gray. The gray ballast is on the left and the light gray in the middle, while on the right I used a 50/50 mix of the two. Personally, none of these looks perfect. I think the gray looks the most realistic as the other options are two light, but it shows almost no variation in colour which isn't really very natural. I'm thinking I'll try another experiment using a 90/10 mix of gray/light gray to introduce a small amount of variation to the gray ballast while maintaining the darker colouring, but I thought I'd ask what you, my dear readers, thought of the different options.
As you can see from the photo I've tried three different approaches (I did this in a bit of a rush hence the ballast isn't very neat):
I used two different colours of Woodland Scenics fine ballast; gray and light gray. The gray ballast is on the left and the light gray in the middle, while on the right I used a 50/50 mix of the two. Personally, none of these looks perfect. I think the gray looks the most realistic as the other options are two light, but it shows almost no variation in colour which isn't really very natural. I'm thinking I'll try another experiment using a 90/10 mix of gray/light gray to introduce a small amount of variation to the gray ballast while maintaining the darker colouring, but I thought I'd ask what you, my dear readers, thought of the different options.
Subscribe to:
Posts (Atom)