So having touched up the few areas that needed work after spraying the body colour I set about touching in the remaining details.
First up were the buffer beams. Now as I mentioned in the previous post I'd bought a pot of Buffer Beam Red acrylic paint from Humbrol's rail colour series, and I had intended to use this to (funnily enough) paint the buffer beams. I was rather shocked when I opened the tin to find that the paint colour really doesn't match the sticker and probably falls foul of the trade description act for not really being red. Having said that it does appear pretty close to the buffer beam on the N gauge Graham Farish loco I own so maybe it is accurate. Either way I thought I'd give it the benefit of the doubt and duly painted both the front and back buffer beams. Well it's definitely not right, or at least it didn't look right, so it was painted over with a thin layer of Model Color red (70.947) which I think you will agree looks the part.
Next I dealt with the window frames, which were more than a little taxing. I wanted the frames to be brass so this required painting them black and then using the same lacquer I used for the cab controls while ensuring I didn't get any on the red body paint. Of course I managed to slip in a few places and so I've had to touch up the paint slightly, but it really isn't noticeable. The windows still need glazing but I can't do that until I've varnished everything so as not to frost the "glass".
After the windows I moved on to fitting the handrails. Annoyingly the left one looks on even more of an angle than it did before, goodness knows why. Anyway the knobs were painted black before fixing to the body so that I didn't run the risk of getting black paint on the saddle tank. The rails were then painted in-situ and everything glued into place. The final step was to slip the whistle through the hole in the mounting bracket, dot a spot of gel superglue on the end of the pipe and then rotate into position.
I'm really pleased with how the details have pulled together, and it certainly looks a lot better than it did a few days ago!
Saturday, April 26, 2014
Quarry Hunslet: Inside The Cab
Before I had all the problems painting the outside of the locomotive I'd painted the inside of the cab while I could still easily get a paintbrush in there. There are two parts to this, painting the backhead controls and painting the inside of the cab walls.
The first job was to touch in the details on the backhead and for this I used three paints. I gave the main backhead surface a light dry brushing with RailMatch oily steel to help bring out some of the details and I used Humbrol acrylic buffer beam red (number 406 from their Rail Colour range) for the regulator handle. For the brass I used Alclad 2 polished brass lacquer. This isn't something I'd used before but it gave just the effect I was looking for. You are supposed to airbrush the lacquer over a gloss surface to give a high shine finish, but I brush painted it over a satin surface which gives a more aged look. I used this lacquer rather than a paint for two reasons. Firstly I couldn't seem to find a brass paint in any of the ranges my local model shop stocks, but more importantly I'm not really a fan of using metallic paints at this scale, unless they are being sparingly dry brushed. I find that the shiny flecks in the metallic paints (that give them the metallic look) are always fairly large and just look really wrong at the small scale we are working with. This lacquer doesn't suffer from this problem at all and I'm betting it would look fantastic airbrushed onto a larger area.
The second job was to paint the inside of the cab walls. From photos, and from having visited the odd cab over the years, I've noticed that generally the bottom half of the walls are painted black, while the top half is usually a buff or cream colour. I'm guessing the use of the lighter colour is to make the cab feel bigger and less claustrophobic. Given the paints I had to hand I used ivory and black from the Model Color range; painting the ivory on first and then masking to get a straight edge to paint the black against.
Personally I think both parts have worked really well, and now that they are assembled together it really does look good.
Labels:
Alclad 2,
Brian Madge,
Humbrol,
Model Color,
modelling,
OO9,
RailMatch
Friday, April 25, 2014
Quarry Hunslet: The Crimson Horror
So, as you may have seen from my rather brief previous post, painting the main body colour of the locomotive did not at all go to plan. Fortunately it was possible to rescue the situation as you can see from todays photo.
Here in Yorkshire we haven't had much sun today which explains why the colour looks way brighter than it really is (the camera over compensating for the terrible light). In reality I've painted it using Humbrol acrylic #20 "crimson", which is quite a dark red. There are a number of areas that need touching up but in general the main areas are perfect.
Now you've seen that the situation was recoverable, let's back up and see how I ended up in quite such a mess. After painting the cab controls (which I'll come back to in a later post) I carefully masked up the inside of the cab while it was still separate from the body and then glued it into place. I then masked up the rest of the model (using the excellent Tamiya masking tape). I also used some Humbrol maskol at the edges of the tape, or where it was difficult to line up the tape properly, including around the cab windows. I then sprayed on the Humbrol crimson paint.
My first mistake was to use too much paint. Paul had warned me that red in particular is quite translucent and so benefits from a white primer. In fact this red paint was so translucent that I could see the white primer through it in places. To stop the white showing through I had to add more paint. Once the paint was dry (or at least I thought it was) I noticed that it appeared to have run on one of the cab side panels. It was annoying but I could probably have lived with that. What I couldn't live with was what happened next.
Now I don't know quite what the problem was but as I removed the maskol I'd used around the windows it pulled off the top layer of paint leaving just the primer behind. If this wasn't bad enough as I tried to remove the masking tape from inside the cab I popped one of the side panels loose. Finally when trying to remove the masking tape from the chimney it simply fell off. At this point I was not a happy bunny and certainly not relishing the thought of repainting. One of the main problems was that I wouldn't be able to mask things up in the same way now the cab was (mostly) attached to the footplate, so I decided to brush paint instead of spraying.
Before I could repaint I had to finish removing the old paint which given it was all on a metal surface came off quite easily with the aid of cotton wool buds, nail polish remover and blunted cocktail sticks. I did have to replace the rivet transfers though as they came off with the paint. So once everything was nicely cleaned up I brushed on Humbrol acrylic grey primer and left it to dry. To say it was streaky was a bit of an understatement but I decided I'd continue on and brush on the top coat; still Humbrol acrylic crimson, but from a small pot. This was definitely not a wise move. It turns out that none of the Humbrol acrylic paints brush on well; I suppose they might if diluted, but then I'd probably have the same translucent problem. By this stage it was looking pretty horrible, so I started to strip the paint off for a second time.
Once the paint was cleaned off for a second time, I again masked the black areas and the inside of the cab as well as I could and sprayed on the primer. This time I went for a red oxide primer in the hope that even if the crimson was slightly translucent it wouldn't show up. The primer went on well, so I then sprayed the crimson again, being careful to use as little paint as possible. After leaving it to dry over night I carefully removed the masking tape and this time everything went to plan. Not only did the paint stay attached but I hadn't ruined the cab interior either.
So I now have some tidying up to do (the edge of the cab roof for instance), and then I can finish painting in the details.
Labels:
Brian Madge,
Humbrol,
modelling,
OO9,
Tamiya
Wednesday, April 23, 2014
In Need Of A Little Restoration
Let's just say that painting the body colour didn't exactly go to plan and leave it at that. I'll recount the whole nightmarish tale when I have some slightly more heartening progress to report.
Labels:
Brian Madge,
modelling,
OO9
Tuesday, April 22, 2014
Quarry Hunslet: Primed and Ready
While I was a little worried about actually having the skills to build this locomotive, I'm also worried about my painting skills after the disaster that was the Baguley-Drewry. I have just invested in an airbrush (more on that in a later post), but for this loco I'm going to stick with what I know and use aerosol cans of Humbrol paint. There are two main changes to my approach from last time. One I'm going to take more time to ensure each colour is fully dry before masking, and two I'm using more expensive masking tape (Tamiya).
The first step to painting was to dismantle the locomotive to remove the motor and the cylinders etc. I then primed it with a white primer meant for painting cars to provide a good base colour for the later colours.
I'm still treating the cab and body separately until I've painted the cab controls which is my it is missing in the middle photo. I decided the next colour would be the black which makes up the majority of the body, so I masked off the tank, buffers and cylinder covers (the purple stuff is Humbrol Maskol, which I really should remember to only use with the window open) and sprayed on a couple of layers of satin black. After leaving the paint to dry for an hour or so I gently eased off the tape and maskol and was pretty impressed with how it has turned out; there are a few spots that need touching up but I can live with that. Buying decent masking tape was certainly worth every penny.
Next up will be painting the inside of the cab so I can finally attach the cab to the footplate before spraying the main body colour.
Labels:
Brian Madge,
Humbrol,
modelling,
OO9,
Tamiya
Sunday, April 20, 2014
Quarry Hunslet: Now With Brass Knobs On!
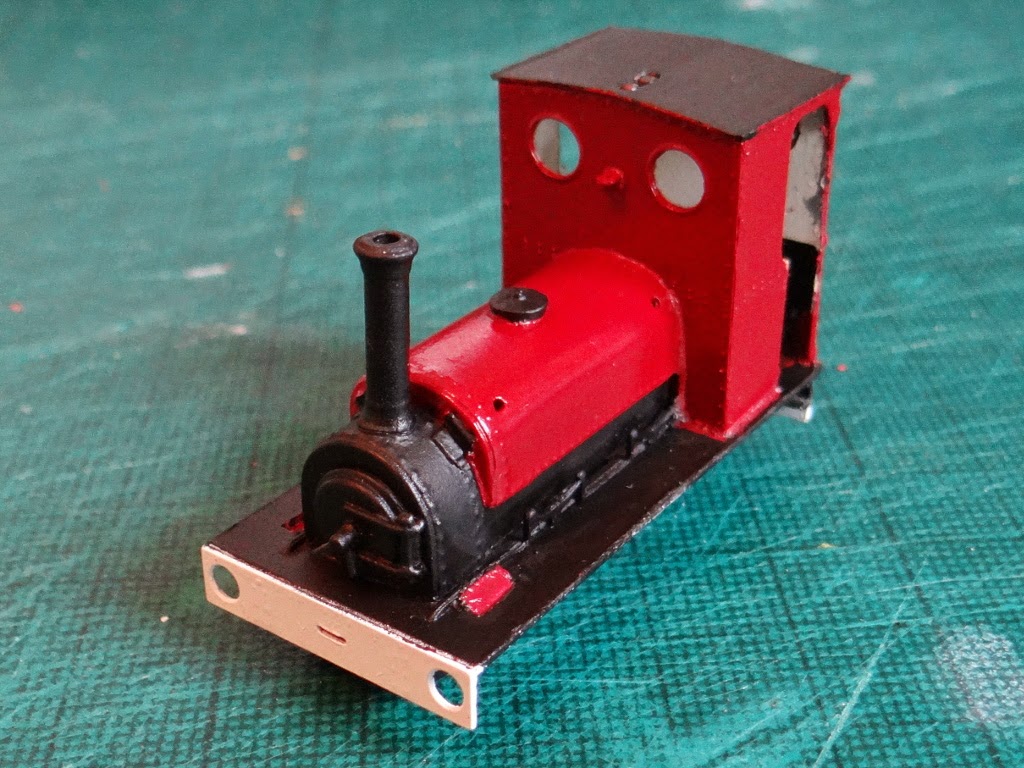
So today's job was to fit the final detailing pieces to the locomotive; the handrails. I'd put this off as I had a feeling it might not be particularly easy to get all four handrail knobs in the right place so that the rails are both horizontal and at the same height on both sides of the saddle tank. I wasn't wrong as it's taken me a number of attempts to get it right.I started by looking at a number of photographs and eventually spotted that the knobs were at the same height on the saddle tank as the rivets on the cab front. This made positioning the rear two knobs fairly easy. It also turned out that the 6mm masking tape I had to hand was a perfect fit between the bottom of the tank casting and the rivets. This meant, in theory, that I could lay a piece of tape along the length of the tank to get the right height for the front two knobs. After aligning the tape, I drilled the four holes and test fitted the knobs (these are the short handrail knobs from Eileen's Emporium) and brass wire for the rails themselves. The right hand side (as seen from the front) was pretty much spot on but the left side was terrible; somehow I'd ended up with the hole too far forward and too far down. I filled the hole with some Deluxe Materials Perfect Plastic Putty, waited for it to dry and then drilled a new hole in what I thought was a better spot. I'm not sure how, given how close the two holes were, but this time I was too far back and too far up. So the hole was filled again and then a third hole drilled. This one is much better, although not perfect, but by this point I was running out of casting to drill into so it will do.
I haven't glued the handrail knobs into place as it makes sense to do that after I've painted the tank, which also means I haven't finally trimmed the rails to the right length either, but the video should give you a pretty good sense of how it now looks.
As well as getting it to run further in each direction along the track (just for GB) the eagle eyed amongst you may notice that I've been at the Archer rivet transfers again. the whistle mounting bracket is now riveted to the cab front, if that isn't attention to detail then I don't know what is!
The only things now missing are the things I can't fit until it is painted; the reversing lever (which I can't fit until the cab is fixed in place), the whistle, and name and maker plates, which haven't yet arrived from Narrow Planet. This means the next step is to find a can of primer
Quarry Hunslet: The Best Job In The World!
I'm sure that most of you wanted to be a steam engine driver at some point in your life. I know I did as a small child and my afternoon on the Welshpool and Llanfair Light Railway back in 2011 certainly reinforced how much fun it is. This of course means that we need a driver to enjoy the Quarry Hunslet once it's completed. Fortunately the kit comes with a suitably posed figure.
As with the other whitemetal castings in this kit the driver didn't need much cleanup and a quick blast of grey primer gave a suitable base colour. Painting was done using Model Color acrylics (dark flesh, black, burnt umber, white, flat blue, and scarlet) and then the whole thing was dusted with Humbrol smoke weathering powder before a final blast of matt varnish toned things down even further. Not the best painted miniature I've ever done (I used to paint Warhammer figures, Night Goblins were my favourites) but certainly not the worst. Hopefully he'll enjoy the ride!
Labels:
Brian Madge,
Humbrol,
Model Color,
modelling,
OO9
Subscribe to:
Posts (Atom)


