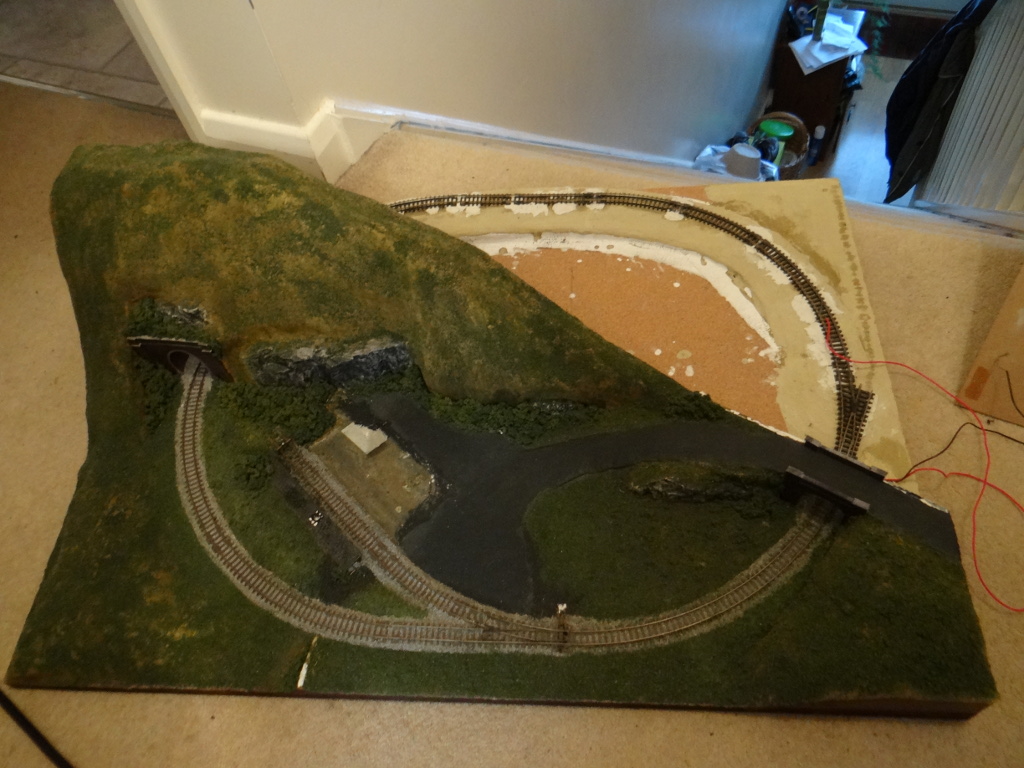
It's been two years since I last blogged about Jerusalem, and almost two years since I started looking at modelling in OO9. In all that time Jerusalem has hardly been used, and in fact for over half of that time the layout has been stored in the loft to give me more space to model other things. While I enjoyed building Jerusalem and learnt a lot I'm happy to admit that there were many things that were wrong with it. The curves were two tight for a mainline, as seen by the problems with the carriage and the tunnel, the track was badly laid which led to some derailments and the points didn't work well as I relied on the blades to switch the power. In fact the whole layout concept was a serious compromise.
If you remember back to the very beginning of Jerusalem the choice of building in N gauge was purely motivated by me wanting a continuous run layout and not having the room to build such a layout in OO gauge. In retrospect this was a mistake as I'm much happier working in 4mm to the foot scale or above than the 2mm to the foot of N gauge. So when tidying the loft last weekend I made the decision that given all the problems with Jerusalem I was never going to go back to it, and will probably never return to such a small scale either, so the layout was simply taking up valuable storage space.
So as you can see the layout has come down from the loft and anything useful has been stripped from the layout, and the board has now been dumped in the garage ready to go out with the rubbish (or to the tip if I can't be bothered breaking it down further). Some of the parts, like the trees, might be reusable in 4mm scale but I'll hold on to the rest as well as there is no resale value in a few painted animals and some dry stone walling. The loco and rolling stock though are likely to be sold to provide funds for more modelling as it seems silly having them sat collecting dust when I have no sentimental attachment to them.
Showing posts with label N Gauge. Show all posts
Saturday, November 21, 2015
Saturday, November 22, 2014
Painted Sheds
Having been side tracked by building some OO9 gauge track, I've finally gone back and painted the two N gauge sheds built from the Severn Models kit. Both models involved me trying a new technique in their painting.
I painted the walls and door of the wooden shed using my standard approach for aged wood which has worked well on the OO9 wagons I've recently been building. This seems to work well for N gauge buildings as well. When it came to the roof, however, I wasn't happy with the very flat look of painted brass. To add a little texture I painted it with RailMatch roof dirt and then blew on a small amount of polyfilla while the paint was still wet. Once the paint had dried I then painted it again to cover the white plaster. This seems to have given a nice surface, although I don't think the same would work in 4mm scale as the texture would still be fairly smooth.
I've never tried painting red brick before and the second shed caused quite a few problems. I tried a number of different approaches before I settled on something that mostly worked. In the end I painted the walls with RailMatch dark brick, and then used thinned down RailMatch weathered stone run into the mortar gaps. A final patchy black wash made things look nice and dirty. The corrugated roof was initially painted with roof dirt before a dry brushing of Model Color London grey. This gave a nice approximation of new corrugated tin which was then aged using repeated applications of MIG Productions standard rust effects.
While I did enjoy building and painting these sheds, the slight detour back to N gauge modelling has confirmed that I'm much happier working at 4mm to the foot scale so I don't think I'll be returning to N gauge at any future point.
I painted the walls and door of the wooden shed using my standard approach for aged wood which has worked well on the OO9 wagons I've recently been building. This seems to work well for N gauge buildings as well. When it came to the roof, however, I wasn't happy with the very flat look of painted brass. To add a little texture I painted it with RailMatch roof dirt and then blew on a small amount of polyfilla while the paint was still wet. Once the paint had dried I then painted it again to cover the white plaster. This seems to have given a nice surface, although I don't think the same would work in 4mm scale as the texture would still be fairly smooth.
I've never tried painting red brick before and the second shed caused quite a few problems. I tried a number of different approaches before I settled on something that mostly worked. In the end I painted the walls with RailMatch dark brick, and then used thinned down RailMatch weathered stone run into the mortar gaps. A final patchy black wash made things look nice and dirty. The corrugated roof was initially painted with roof dirt before a dry brushing of Model Color London grey. This gave a nice approximation of new corrugated tin which was then aged using repeated applications of MIG Productions standard rust effects.
While I did enjoy building and painting these sheds, the slight detour back to N gauge modelling has confirmed that I'm much happier working at 4mm to the foot scale so I don't think I'll be returning to N gauge at any future point.
Wednesday, November 12, 2014
A Tiny Brick Shed
Okay, so I'm easily seduced by shiny brass models.
This one went together just as easily as the wooden shed. I haven't started painting either of them yet as I haven't been at home when it hasn't been raining so I've been unable to spray them with primer. Hopefully the weather will improve and I can finish these off soon. I did, however, pick up a pot of RailMath Dark Brick (#2424) on the way home so I think I now have the paints I need to paint both models.
Tuesday, November 11, 2014
A Tiny Wooden Shed
So here we have the first of the two sheds from the Severn Models kit I showed you yesterday. As expected it went together nice and easily. I soldered everything but the barge boards (just too fiddly) even though the instructions say to just use glue. In retrospect I think this was a good idea as I had problems with the barge boards as the superglue took an awful long time to grab properly. As you can see it really is tiny, given that it's sat on a 50p piece.
So that's half the kit built (there is the brick shed to go) and I think we can agree it builds up into a nice model. I'll paint this one next before building the other shed, as I know how to paint old looking wood, but I've no idea how to go about painting brick work.
Monday, November 10, 2014
A House in Your Hand
A shiny new brass kit fell through the letterbox today. Given that I've shifted to modelling at 4mm to the foot scale from the 2mm scale of N gauge and have now boxed up and stored Jerusalem in the loft (to make way for me as yet unannounced new OO9 gauge layout) you may be surprised to see that it is in fact an N gauge kit.
I didn't actually buy this kit in the normal sense of the verb "to buy". This is actually a reward for backing a crowd funding project on Kickstarter. Specifically the project aimed at developing a number of etched brass building kits for N gauge model railways with the tag line being "A House in Your Hand". Now while there was the option of lots of lovely kits for large buildings, given that I wasn't modelling in N gauge at the moment, I went for the cheaper option of a kit for two small sheds, as a way of getting something to play with while showing my support for the project.
Now you do have to be careful with Kickstarter projects, in that you are essentially putting up money to fund the development of something that might not turn out to be feasible. There have been some projects that have raised huge amounts of money yet failed to deliver on their promises, so it really is buyer beware. My rule of thumb is never back a project for more money than you would be willing to write off. So far I've backed 10 projects and four have delivered. Five of them have completion dates in the future but one, in fact the first project I backed, should have finished in January, so is at least 8 months behind schedule. This was also an N gauge related project, but I'm now sceptical that it will ever grace this blog. Anyway back to this kit...
First impressions are that the etching looks great, although the instructions are a little thin. There is a side of A4 telling you general things about building brass kits (they suggest superglue but I think I'll solder for added strength), and then two exploded diagrams one for each shed. Unfortunately in a couple of places the orientation of some parts (barge boards mostly) is a little unclear, although I think once I actually try to assemble it things will become more obvious.
Currently the kits aren't publicly available to buy, but a website for Severn Models is under construction so hopefully that will change shortly. While I have no immediate use for these sheds I'll be assembling and painting them when I get a chance so I'll let you know how I get on.
I didn't actually buy this kit in the normal sense of the verb "to buy". This is actually a reward for backing a crowd funding project on Kickstarter. Specifically the project aimed at developing a number of etched brass building kits for N gauge model railways with the tag line being "A House in Your Hand". Now while there was the option of lots of lovely kits for large buildings, given that I wasn't modelling in N gauge at the moment, I went for the cheaper option of a kit for two small sheds, as a way of getting something to play with while showing my support for the project.
Now you do have to be careful with Kickstarter projects, in that you are essentially putting up money to fund the development of something that might not turn out to be feasible. There have been some projects that have raised huge amounts of money yet failed to deliver on their promises, so it really is buyer beware. My rule of thumb is never back a project for more money than you would be willing to write off. So far I've backed 10 projects and four have delivered. Five of them have completion dates in the future but one, in fact the first project I backed, should have finished in January, so is at least 8 months behind schedule. This was also an N gauge related project, but I'm now sceptical that it will ever grace this blog. Anyway back to this kit...
First impressions are that the etching looks great, although the instructions are a little thin. There is a side of A4 telling you general things about building brass kits (they suggest superglue but I think I'll solder for added strength), and then two exploded diagrams one for each shed. Unfortunately in a couple of places the orientation of some parts (barge boards mostly) is a little unclear, although I think once I actually try to assemble it things will become more obvious.
Currently the kits aren't publicly available to buy, but a website for Severn Models is under construction so hopefully that will change shortly. While I have no immediate use for these sheds I'll be assembling and painting them when I get a chance so I'll let you know how I get on.
Friday, February 21, 2014
Voiding The Warranty
While in the UK many of the ready to run locomotives are produced by Hornby, Bachmann, or Dapol there are many other companies which produce locomotives and roling stock. In Japan, for instance, KATO are one of the main manufactures of HO and N gauge models. One of the ranges they produce in N gauge is the Pocket Line Passengers. I'm guessing the name comes from the fact that the range is quite cheap, and so could be bought with pocket money, and in fact a full set consisting of track, controller, a steam locomotive and two carriages costs just £45. Mind you its cost is reflected in the quality of the models, as you can see from this publicity shot.
Now you may be wondering why am I telling you about a cheap Japanese N gauge train set? The answer lies in the carriages.
To anyone who has ever handled an N gauge steam locomotive it will probably be obvious that the locomotive in the photo doesn't actually contain a motor, there is simply no where to put one; even a micro-motor with a belt drive through the smoke box would struggle to power that model. The solution KATO have gone for is to fit the motor into one of the carriages. Basically the entire bottom section of the carriage, everything that is black, including the hand-rails on each end, is part of a small powered chassis. Now not only do KATO sell the full train sets but they will happily sell the chassis as spare parts, and it turns out that they are perfect for providing power for OO9 gauge locomotives, such as the Baguley-Drewry diesel locomotive from Narrow Planet that I'm intending to build. So a few weeks ago I ordered the chassis (it's KATO part number 11-104) from a supplier in Japan, via Amazon, for a total price, including P&P of just £13.01. It arrived last weekend, but I've only just got around to doing anything with it, and the first thing I did definitely voids any warranty it might come with!
Although the chassis is very small it is too long and slightly too wide to fit in the body shell of the Narrow Planet kit. Fortunately making it fit is fairly easy. Narrowing the chassis is simply a case of filing off the axle boxes and leaf springs, making it shorter, however, requires more drastic action.
On the way to work yesterday (after being slightly delayed after a truck hit the railway bridge in Penistone), I briefly called in at antics model shop and picked up a razor saw (specifically this one from Expo Tools). With the razor saw hacking the ends off took just a couple of seconds, leaving me with a 46mm long chassis (or around 11 foot 6 inches at 4mm to the foot scale), perfect for powering the Baguley-Drewry. One precaution I took, and which I'd recommend, was to use masking tape to cover the top of the central section while making the alterations to stop small bits of plastic getting into the motor and drive assembly.
As I haven't done anything about a track plan yet, I tested the chassis by running it around Jerusalem for an hour or so in each direction to make sure it was well run in, and it runs perfectly at both high and low speed, even over the points. So now I have the chassis sorted I can start thinking about assembling and painting the body.
Now you may be wondering why am I telling you about a cheap Japanese N gauge train set? The answer lies in the carriages.
To anyone who has ever handled an N gauge steam locomotive it will probably be obvious that the locomotive in the photo doesn't actually contain a motor, there is simply no where to put one; even a micro-motor with a belt drive through the smoke box would struggle to power that model. The solution KATO have gone for is to fit the motor into one of the carriages. Basically the entire bottom section of the carriage, everything that is black, including the hand-rails on each end, is part of a small powered chassis. Now not only do KATO sell the full train sets but they will happily sell the chassis as spare parts, and it turns out that they are perfect for providing power for OO9 gauge locomotives, such as the Baguley-Drewry diesel locomotive from Narrow Planet that I'm intending to build. So a few weeks ago I ordered the chassis (it's KATO part number 11-104) from a supplier in Japan, via Amazon, for a total price, including P&P of just £13.01. It arrived last weekend, but I've only just got around to doing anything with it, and the first thing I did definitely voids any warranty it might come with!
Although the chassis is very small it is too long and slightly too wide to fit in the body shell of the Narrow Planet kit. Fortunately making it fit is fairly easy. Narrowing the chassis is simply a case of filing off the axle boxes and leaf springs, making it shorter, however, requires more drastic action.
On the way to work yesterday (after being slightly delayed after a truck hit the railway bridge in Penistone), I briefly called in at antics model shop and picked up a razor saw (specifically this one from Expo Tools). With the razor saw hacking the ends off took just a couple of seconds, leaving me with a 46mm long chassis (or around 11 foot 6 inches at 4mm to the foot scale), perfect for powering the Baguley-Drewry. One precaution I took, and which I'd recommend, was to use masking tape to cover the top of the central section while making the alterations to stop small bits of plastic getting into the motor and drive assembly.
As I haven't done anything about a track plan yet, I tested the chassis by running it around Jerusalem for an hour or so in each direction to make sure it was well run in, and it runs perfectly at both high and low speed, even over the points. So now I have the chassis sorted I can start thinking about assembling and painting the body.
Labels:
Expo Tools,
KATO,
modelling,
N Gauge,
Narrow Planet,
OO9
Saturday, November 30, 2013
TB Or Not TB?
I've never been lucky enough to see a badger, and if the current government has its way, the chance of me ever seeing one will be very low, so I'll have to make do with the next best thing; a badger roaming free in Jerusalem.
The badger is from the same Langley Models pack (A64) as the squirrel I added to Jerusalem back in September. In contrast to the squirrel I couldn't get away with painting the badger in a single colour although I did start with the same grey primer.
Because I'm modelling in N gauge (2mm to the foot) this badger really is tiny and I had to use the smallest paintbrush I own along with tiny amounts of paint, but I'm really happy with how it turned out. It looks much better in real life and will be a nice addition to the layout once I've figured out where I want him to sit.
The badger is from the same Langley Models pack (A64) as the squirrel I added to Jerusalem back in September. In contrast to the squirrel I couldn't get away with painting the badger in a single colour although I did start with the same grey primer.
Because I'm modelling in N gauge (2mm to the foot) this badger really is tiny and I had to use the smallest paintbrush I own along with tiny amounts of paint, but I'm really happy with how it turned out. It looks much better in real life and will be a nice addition to the layout once I've figured out where I want him to sit.
Tuesday, October 8, 2013
Coming Soon...
I mentioned before that there was very little trade at this years Barrow Hill Live. This did mean that I managed to leave without buying anything, although having looked at the Bachmaan display I have a feeling I'll be spending some money soon.
Bachmann's stand wasn't your typical retailer stand as they didn't actually appear to have anything for sale. What they did have was a working N gauge layout (quite fun to watch) and two glass display cupboards showing manufacturing samples of some of their new products.
I was obviously most interested in the N gauge models on display (these are Graham Farish models as Bachmann is the parent company). In the first photo you can see that they are about to release a model of Tornado in BR Blue, the same livery she is currently wearing. The unpainted model in this photo is I believe a Midland 4F, but as they weren't labelled in any way it's hard to be certain. While the model of Tornado looks fantastic both of these are really too big for Jerusalem.
The second photo shows a much more promising candidate to expand Jerusalem's loco fleet; an LMS 3F Jinty. This model will apparently be available in a BR black with the early crest so will match my existing loco nicely, and hopefully it's diminutive size will be reflected in it's cost once available.
The third photo is, however, the most interesting. If you read the previous post then you will know that I'm interested in locomotives that at one time may have travelled along the line at the bottom of our garden; this is one such locomotive. This 2-4-2T was designed by Aspinal for the Lancashire and Yorkshire Railway (although seen here in a BR livery) and I actually have a photo of one in Penistone. Unfortunately, this model is OO gauge and so won't be any use for Jerusalem but I'm still tempted to buy one. If I do buy one though I'll be going for the limited edition version from the National Railway Museum who are going to be releasing it in it's original Lancashire and Yorkshire Railway livery through Locomotion Models.
Bachmann's stand wasn't your typical retailer stand as they didn't actually appear to have anything for sale. What they did have was a working N gauge layout (quite fun to watch) and two glass display cupboards showing manufacturing samples of some of their new products.
I was obviously most interested in the N gauge models on display (these are Graham Farish models as Bachmann is the parent company). In the first photo you can see that they are about to release a model of Tornado in BR Blue, the same livery she is currently wearing. The unpainted model in this photo is I believe a Midland 4F, but as they weren't labelled in any way it's hard to be certain. While the model of Tornado looks fantastic both of these are really too big for Jerusalem.
The second photo shows a much more promising candidate to expand Jerusalem's loco fleet; an LMS 3F Jinty. This model will apparently be available in a BR black with the early crest so will match my existing loco nicely, and hopefully it's diminutive size will be reflected in it's cost once available.
The third photo is, however, the most interesting. If you read the previous post then you will know that I'm interested in locomotives that at one time may have travelled along the line at the bottom of our garden; this is one such locomotive. This 2-4-2T was designed by Aspinal for the Lancashire and Yorkshire Railway (although seen here in a BR livery) and I actually have a photo of one in Penistone. Unfortunately, this model is OO gauge and so won't be any use for Jerusalem but I'm still tempted to buy one. If I do buy one though I'll be going for the limited edition version from the National Railway Museum who are going to be releasing it in it's original Lancashire and Yorkshire Railway livery through Locomotion Models.
Monday, September 30, 2013
Maybe It's A Woollen Mill?
I'm still to decide exactly what business S. A. Tan and Sons are in, but maybe they are running a woollen mill?
I didn't want to fill the layout with sheep, so I've used just three from the pack of eight I bought from Langley Models (model number A70). For those that are interested (and to make sure I can remember) they were painted by first spraying with Humbrol grey primer before the face and shadow detail was painted black (Tamiya flat black). The wool was then dry brushed using first white (Tamiya) and then Ivory (Model Color).
If you look closely you might also be able to spot the squirrel.
I didn't want to fill the layout with sheep, so I've used just three from the pack of eight I bought from Langley Models (model number A70). For those that are interested (and to make sure I can remember) they were painted by first spraying with Humbrol grey primer before the face and shadow detail was painted black (Tamiya flat black). The wool was then dry brushed using first white (Tamiya) and then Ivory (Model Color).
If you look closely you might also be able to spot the squirrel.
Friday, September 27, 2013
The 13:05 To Jerusalem
Today’s post was going to be all about sheep, but just before 1pm the post arrived with my repaired locomotive, so I can finally show you a working passenger train.
I thought I'd go for a video rather than a photo and while the train is probably moving a bit to fast and the video quality is poor you should still get the general idea.
Labels:
Graham Farish,
Jerusalem,
My Layout,
N Gauge,
video
Wednesday, September 18, 2013
We Are Sorry To Announce.....
British Railways are sorry to announce that the introduction of a passenger service through Jerusalem, as well as all goods services, will be delayed for an unknown period due to a failed locomotive.As some of you will know I've recently had a birthday, and many of the presents were train related and will probably turn up on this blog at some point. One of those presents was a Mk 1 57ft suburban brake (Graham Farish model 374-312A) which, for the first time, would have brought a passenger service to Jerusalem. Unfortunately the failure of my only locomotive has brought a halt to "playing trains" for a while -- modelling will continue though.
The locomotive failed almost five months to the day after I bought it and so fortunately it is still under warranty. It has run perfectly, in both directions, since it arrived, at least until Friday last week. The first sign that there was anything wrong was when I tried running it in reverse; it had a pronounced wobble and was making a weird clicking noise. Strangely it ran forward without any issues what so ever. From a quick examination, it appeared that as the wheels rotated the rod connected the middle wheel and valve gear wasn't moving properly as the vertical piece it is connected to wasn't moving at all (it should swing left and right). I was going to see if running it forward for a few minutes would help it settle, but it hadn't moved more than about six inches when the connecting rod popped off (as you can see in the photo). Given that I have no idea what the underlying problem was or how to repair the obvious problem properly it has now been boxed up and sent off for repair under warranty. Hopefully it will return soon.
The coach is, however, excellent and I really am looking forward to being able to run it properly; I've been slightly lucky in that I didn't have anything anywhere near as long as the coach to check clearances when building the landscape and it only just clears the tunnel mouth... but just is enough. I will, however, definitely be more careful with clearances on future layouts, although if I can avoid such tight 1st radius curves in future then the problem will (at least partially) disappear.
Saturday, September 7, 2013
Squirrel!
When I ordered the articulated truck, that has been the subject of recent posts, from Langley Models I also ordered a number of other items that will hopefully add some more interest to Jerusalem. One of those items was a pack of seven wild animals (item number A64) which contains; 2 foxes, 2 feeding rabbits, 1 rabbit sitting up, 1 badger, and a squirrel. So far I've only painted the squirrel.
I would have shown you the squirrel in situ on the layout but a) I haven't quite decided where it is going yet, and b) it is so small I didn't think I'd be able to get a decent picture of it once it was in place.
While modelling in N gauge is great, as it allows me to have lots of railway in a small space, it does mean that some of the details really are very small.
I would have shown you the squirrel in situ on the layout but a) I haven't quite decided where it is going yet, and b) it is so small I didn't think I'd be able to get a decent picture of it once it was in place.
While modelling in N gauge is great, as it allows me to have lots of railway in a small space, it does mean that some of the details really are very small.
Wednesday, September 4, 2013
Glazed
As you can see, other than some weathering, the articulated flatbed truck I started to build from a Langley Models kit a few posts ago is now complete. The final step was to glaze the windows.
Given the small size of the windows, and the relative thickness of the castings, it was obvious that sticking some clear plastic inside the cab wouldn't work at all. One alternative would have been to try and cut some plastic to fit flush inside the frames but that also didn't seem like a sensible route. Fortunately there is a much easier alternative; Micro Kristal Klear.
Microscale Industries' Micro Kristal Klear (I bought mine from Eileen's Emporium) is a PVA like glue that is designed to both dry clear and to not discolour clear plastic. This makes it perfect for gluing windows in place, but it can also be used to make the windows. You simply use a cocktail stick to smear a small amount around the edge of the window frame, and then draw the glue across the opening to make a thin film. You can see this in action above, after I'd just done the first window. Once dry the glue is clear and the window is glazed.
Sunday, September 1, 2013
Drafty
As you can see, progress on the Leyland Beaver articulated flatbed truck from Langley Models has moved on a little further than the primer coat I showed in the previous post.
In real life the model looks neatly painted, but this close up photo shows that I wasn't quite as neat as I thought I had been. Mind you, given that the model is less than 2cm tall the slight amount of over paint is actually quite small. The metal work also looks much better in real life. I'm guessing the problem here is that the reflective flecks in the paint (to make it sparkle) are quite large in comparison to the details I'm trying to paint.
I'm more than happy with how it's going so far though, especially after I managed to fit a driver (I had to cut the legs off the model to get it to fit) which adds some life to the vehicle. I still have to paint the rear flatbed section and then I'll have to deal with cutting out the draft by adding some windows, all of which will, I'm sure, appear in a future post.
In real life the model looks neatly painted, but this close up photo shows that I wasn't quite as neat as I thought I had been. Mind you, given that the model is less than 2cm tall the slight amount of over paint is actually quite small. The metal work also looks much better in real life. I'm guessing the problem here is that the reflective flecks in the paint (to make it sparkle) are quite large in comparison to the details I'm trying to paint.
I'm more than happy with how it's going so far though, especially after I managed to fit a driver (I had to cut the legs off the model to get it to fit) which adds some life to the vehicle. I still have to paint the rear flatbed section and then I'll have to deal with cutting out the draft by adding some windows, all of which will, I'm sure, appear in a future post.
Thursday, August 29, 2013
Beavering Away
I've now cleaned up the white metal castings and started to assemble the articulated lorry from the Langley Models kit I showed in the previous post.
As for the type of vehicle I'm building, GB was closest in identifying the vehicle as a Leyland lorry, although Adrian was the one to spot that it was articulated. The final missing piece of identification is the model of the lorry, which the title of this post should help with.
The model (Langley Models number E20) is supposed to represent a Leyland Beaver flatbed lorry from somewhere in the period 1949 to the 1970's, which fits perfectly with setting the layout in 1955.
I haven't decided on the full colour scheme for the vechicle yet, although I am leaning towards the same as the example shown on the website of a red body, black underframe, with shiny metal details (the bumper, radiator etc.). As you can see from the photo I've only got as far as the basic grey primer, and there is still some work to do filling gaps between the castings as well (most obvious around between the roof and cab walls but I can't do this until I've painted the inside of the cab and glued down the roof). Even in grey primer though I'm liking how it looks so hopefully it will be a good addition to the layout.
As for the type of vehicle I'm building, GB was closest in identifying the vehicle as a Leyland lorry, although Adrian was the one to spot that it was articulated. The final missing piece of identification is the model of the lorry, which the title of this post should help with.
The model (Langley Models number E20) is supposed to represent a Leyland Beaver flatbed lorry from somewhere in the period 1949 to the 1970's, which fits perfectly with setting the layout in 1955.
I haven't decided on the full colour scheme for the vechicle yet, although I am leaning towards the same as the example shown on the website of a red body, black underframe, with shiny metal details (the bumper, radiator etc.). As you can see from the photo I've only got as far as the basic grey primer, and there is still some work to do filling gaps between the castings as well (most obvious around between the roof and cab walls but I can't do this until I've painted the inside of the cab and glued down the roof). Even in grey primer though I'm liking how it looks so hopefully it will be a good addition to the layout.
Wednesday, August 28, 2013
By Road As Well As Rail
Given that quite a large area of Jerusalem is taken up by the access road for the factory I thought it only right that I included at least one vehicle within the scene.
I did originally intend to buy a completed vehicle that I could just place on the layout (probably from Oxford Diecast as they sell appropriately scaled models) but in the end I've opted for a model I get to assemble and paint instead.
The kit is made up from fifteen cast white metal parts and is from Langley Models. I'm not going to tell you what the kit is meant to represent at this point to see if any of you can recognize it (or guess); just remember I'm modelling 1955 so this should help you narrow down the possible options.
I did originally intend to buy a completed vehicle that I could just place on the layout (probably from Oxford Diecast as they sell appropriately scaled models) but in the end I've opted for a model I get to assemble and paint instead.
The kit is made up from fifteen cast white metal parts and is from Langley Models. I'm not going to tell you what the kit is meant to represent at this point to see if any of you can recognize it (or guess); just remember I'm modelling 1955 so this should help you narrow down the possible options.
Wednesday, August 21, 2013
Scottish Crates
Having built a loading dock alongside the factory siding I need something to load. Fortunately I'd already sourced something appropriate on my trip to Edinburgh.
When I arrived in Edinburgh I had the afternoon to kill, so rather than heading straight to my hotel I took a slight detour to visit Harburn Hobbies. My reason for visiting the shop was to see their Harburn Hamlet range of N gauge accessories, and after careful consideration I came away with a stack of wooden crates (item number HN 606).
While the stack looks quite good placed on the loading dock, it is also perfectly sized to fit within the open goods wagons meaning I can move it around the layout if I want to. Now of course I need to populate the layout with workers to make the scene more realistic.
When I arrived in Edinburgh I had the afternoon to kill, so rather than heading straight to my hotel I took a slight detour to visit Harburn Hobbies. My reason for visiting the shop was to see their Harburn Hamlet range of N gauge accessories, and after careful consideration I came away with a stack of wooden crates (item number HN 606).
While the stack looks quite good placed on the loading dock, it is also perfectly sized to fit within the open goods wagons meaning I can move it around the layout if I want to. Now of course I need to populate the layout with workers to make the scene more realistic.
Sunday, August 18, 2013
My Eye View
I've now added some scenery to all of Jerusalem (I haven't necessarily finished doing this but it now looks a lot more natural) and while I'll probably go into the details in later posts I thought I'd show you roughly what I see when I sit back and enjoy the view from my study chair.
This isn't a perfect copy of my view due to the lens on the camera curving the image somewhat (also it is slightly overexposed so the grass is darker), but it should give you a fairly good idea of what I'm currently looking at.
Saturday, August 17, 2013
Nephelococcygia
Now I know that when it comes to seeing shapes in clouds (which is apparently called Nephelococcygia) not everyone always sees the same thing. So does anyone else see Max von Sydow's excellent portrayal of Ming the Merciless from the 1980 film version of Flash Gordon (the one with the excellent Queen soundtrack) in this bit of sky from the temporary clouds on Jerusalem?
Personally I can see the eyebrows, moustache, beard and the cowl around the back of his head. Can anyone else see this or am I just going insane?
Wednesday, August 14, 2013
Drive Safely
Not a train, or railway, in sight in today's post. What you are looking at is the road leading away from the factory which bends to the right over the railway and out of Jerusalem. As you can see I've done some more scenic work, specifically hiding the end of the drystone wall and grassing the slope to the left of the road. The main new item is the speed limit sign. Unlike the "Beware of the Trains" sign, I bought this one which is from a set of pre-1960's road signs made by Ancorton Models.
Subscribe to:
Posts (Atom)


