I hate the idea of wasps. Not only do I not like the variety that sting, but the idea of trying to mask up a locomotive to paint on wasp stripes fills me with dread, especially given the smaller scales I usually model in. One of the K12 diesel locomotives was fitted with extra plating that was painted with wasp stripes and while I wanted to be able to model that I didn't think it was going to be possible to mask the parts for painting on wasp stripes, so as a bit of an experiment I included a stencil on the test etch.
I spent a few minutes (spread over a few hours) this morning trying it out. The steps were easy enough; spray the part with primer, spray with yellow paint, stick the part to the back of the stencil using masking tape, spray with black paint, and finally remove the stencil. In theory there is only about five minutes of modelling there but you need to wait for the paint to dry (enough) at each step. The process was frustrated slightly as the can of yellow paint I had seems to have gone off so it didn't cover very well, but I think this proves that I can paint wasp stripes that are good enough.
I'll admit that it's not perfect (I didn't let the yellow full harden so it's bunched up a little around the rivet detail, and it may need a touch more black) but I'm more than happy with how it looks. Don't forget the picture is many times life size, and to the naked eye it looks spot on.
Monday, November 19, 2018
Sunday, November 11, 2018
Alan Keef K12 Diesel: Part 1
Having built the peat wagon I had a go at assembling the parts on the other etch, which turned into.......
You can probably see in the photo that the etch and 3D printed chassis are just slotted together, but hopefully some of you will recognise the loco as a K12 diesel built by Alan Keef Ltd. While I've managed to assemble all the parts around a KATO Centram chassis, I need to make changes to both the etch and the 3D print; there are a few niggling issues but more importantly I managed to mess up the design of the bonnet side panels by misinterpreting the drawings I was working from.
Even though there are issues with the model I think it looks the part, and I'm really happy with the fact that all the complex folds on the etch worked perfectly. It might be a while before I have more progress to show, so while you wait here's a short video of it circling my tiny test track:
Monday, November 5, 2018
Peat Wagon
This mornings post saw the arrival of test etches for a couple of potential kits.
I've hidden the labels in the photograph so as not to completely give the game away, but it wasn't long before I made a start on a quick test build of the simpler of the two etches.
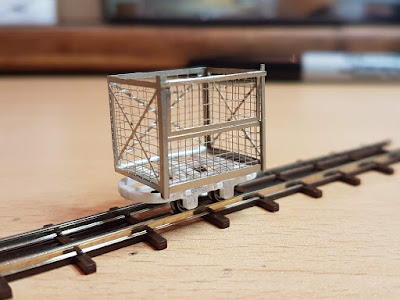
As you can see the etch builds up in to what I think is a fair representation of a peat wagon. It's based on an example preserved at Amberley (from where I've shamelessly "borrowed" the photo). I've worked solely from the photos on that page, with all measurements based on the fact I know the track is 2ft gauge. The etch sits on a 3D printed chassis, based on the Hudson rugga chassis, to produce a 6.5mm gauge model.
A bit of paint and weathering and I'm really rather happy with how it turned out. Mind you the photo hides the fact that it was awkward to assemble, so there will be a slight redesign of the etch before I build any more or before it becomes a kit.
Labels:
3D printing,
etching,
OO6.5
Subscribe to:
Posts (Atom)


