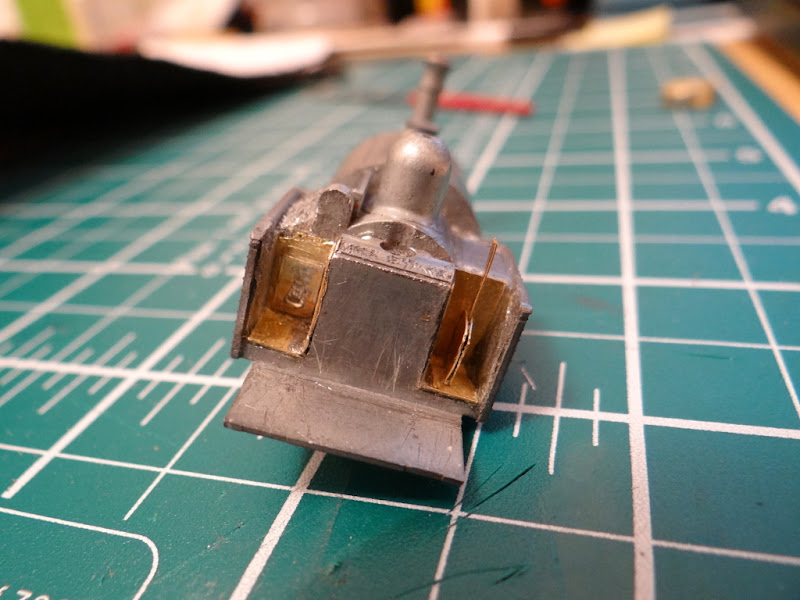
Having removed the coal from the top of the drivers side bunker I decided I'd continue working on the main body casting by doing something about the inside of the cab. On the unaltered "toy" the cab contains a full height plate with no details at all. I'm guessing this was added to give extra strength to the plastic cab but not only does it look wrong when you look through the cab doors but you can't even look through the windows. Removing the top half of the plate was the first thing I did to the casting, even before I took photos of the parts or stripped them of paint. Originally i thought that was all I would do but having thought about it some more I decided to go further and hack out more of the plate so I could fit some details within the cab.
For an idea of what I aiming for here is a useful photo of the prototype without it's cab allowing a good view of the boiler backhead.
The first stage was to cut away more of the vertical plate to allow space either side of the boiler for the coal bunker door and the reversing lever on either side. As I found before the casting is actually quite solid so this took some time. On both sides I cut two vertical slots with a razor saw and then used pliers to snap the piece of the casting away, before tidying up (to a certain extent) with small files.
With space on either side of the boiler I then set about making pieces to fill the gaps. Working with 0.12mm brass sheet I made two parts that fitted nicely either side. These parts were then detailed. On the left side I added a representation of a door into the coal bunker, while on the right I added a reversing lever. The reversing lever was made by cutting down on on an etch of detailing parts from RT Models and making up the base from more brass sheet. The two parts were then glued onto the casting (I did try soldering but the casting just soaks up the heat and I didn't fancy using the blowtorch on the small details).
The next stage was the boiler backhead itself. It ook me four attempts to get something I was happy with. My first couple of attempts involved trying to cut out the right shape and then gluing bits of styrene to the back to hold it in the right place over the casting and then filing the styrene to give the round shape of the boiler. After what seemed like hours with no end in sight I gave up. The next couple, including the final result, were made by roughly rolling a piece of brass sheet to the right diameter, soldering that to a flat sheet and then cutting and filling to give something that would slot over the casting.
Getting the initial shape right was actually quite easy, and then it was just a case of filing and testing it on the casting over and over until I was happy with the result.
It's not a perfect representation of the real thing but once the cab is in place I think even in it's current state it will do the job of providing some detail to glimpse through the door. I am, however, not yet finished as I'm intending to add some of the pipework, a firebox door and that large wheel is a must.


The hard part of detailing the backhead is is knowing what to add and what to leave off! Thats the reason my Dapol Austerity project stalled.
ReplyDeleteI'm hoping I won't get too bogged down in trying to be really faithfully to the prototype. My aim is more for the impression of the right things being there, rather than them all actually being there. So the reversing lever and the large wheel are a must and then some basic pipework. After that I'm guessing painting it all black, adding the cab and probably a driver figure and I'll have the illusion of a cab interior that will survive a passing glance. Knowing me though I could easily get sidetracked into making add detailing parts.
Delete